About participant authentication
Participant authentication via single sign-on (SSO) provides an additional, optional layer of security to prevent unauthorized access to meetings. It requires conference participants to authenticate via an Identity Provider service before they can join the meeting. It can be used instead of, or in combination with, conference PINs.
This topic covers:
- About Single Sign-on
- Using SSO-based authentication with Pexip Infinity
- Supported Identity Providers
- Supported Connect apps
- Joining an SSO-protected VMR
- Joining with other devices
- Authentication and PINs
- Transferring participants
- Display names
- Process for enabling Identity Providers
- Adding Identity Providers to Pexip Infinity
About Single Sign-on
Single Sign-On (SSO) is an increasingly common feature of web services and business tools that enables users to authenticate and log into a third-party service or web page, using the same login credentials as the other systems they already use.
- Convenience and security: the ability to securely log into multiple tools with the same login credentials.
- Reduced tech support costs and greater efficiency with only one password to remember.
- Faster, simpler user administration.
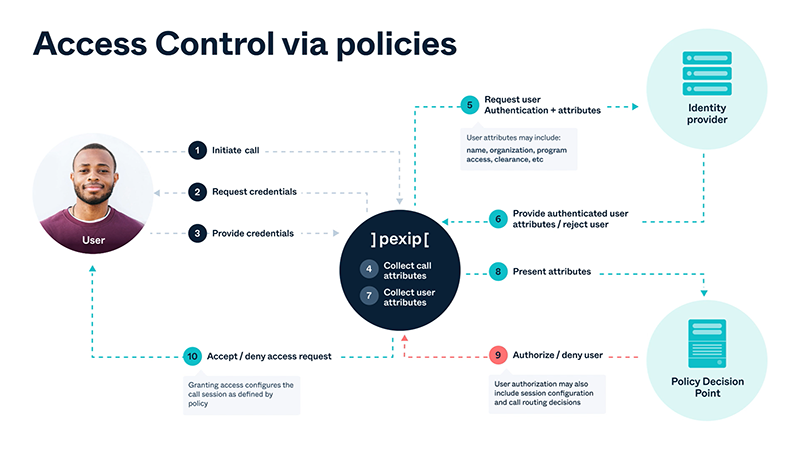
The following animation demonstrates the authentication process with an Identity Provider:

This can be extended, as shown in the next animation, to include local or external participant policy in the decision making process for finer control. This allows you, for example, to override a participant's role, alias and display name before they join a conference.
Using SSO-based authentication with Pexip Infinity
You can optionally require participants who are attempting to access a specific VMR in your deployment to verify their identity using SSO before joining the meeting. The SSO service can also be used to provide a verified display name for meeting participants.
To enable SSO-based authentication, first you set up one or more Identity Providers, which are third-party services (such as ADFS, Microsoft Entra ID or Okta) that store and manage digital identities, and with which users authenticate using SSO. Then, you configure individual VMRs to require that Hosts, Guests, or both authenticate with an Identity Provider to access that VMR.
SSO-based authentication is supported for participants joining via the latest versions of the Connect apps.
Participants joining from other devices (such SIP or H.323 endpoints) can optionally be permitted to join the meeting if the device is locally registered (i.e. registered to the same Pexip Infinity deployment that is hosting the VMR they are attempting to access), or manually admitted by a Connect app user.
You can optionally require participant authentication for meetings scheduled using Pexip's VMR Scheduling for Exchange feature.
When is SSO not required?
In all cases, devices can join a meeting protected by SSO without needing to authenticate if:
- the device is manually dialed out to (either by a conference host or as an Automatically Dialed Participant)
- the device is paired with a participant who is using Webapp2 (and who has successfully authenticated).
Supported Identity Providers
The participant authentication feature supports two widely-used standard industry protocols:
- SAML 2.0
- OpenID Connect (OIDC)
We have provided step-by-step guides for configuring the following SAML Identity Providers:
- ADFS
- Microsoft Entra ID (formerly called Azure AD)
- Okta
For guidance on configuring other Identity Providers, please contact your Pexip authorized support representative.
Supported Connect apps
The newer versions of the Connect apps support participant authentication. These are:
- Connect web app from v27 and later
- Connect desktop app from v1.9 and later
- Connect mobile apps for iOS and Android from v1.9 and later.
Participants using older versions of the Connect apps cannot join VMRs with participant authentication enabled. Instead they will receive a message saying that their client does not support SSO-protected meetings, and suggesting they upgrade their client.
Participants using other versions of the Connect apps can still join the meeting if the VMR:
- does not require participant authentication
- requires participant authentication for Hosts only, and the participant is joining as a Guest
- requires participant authentication for Guests only, and the participant is joining as a Host.
Note that all references to Connect app support also includes bespoke WebRTC clients using the Pexip client APIs.
Joining an SSO-protected VMR
To join a Virtual Meeting Room or Virtual Auditorium with participant authentication enabled, using a Connect app:
- Access the VMR in the usual way (e.g. by entering the room name, or via a Virtual Reception).
- If asked, select whether you are a Host or Guest, and enter the PIN (if required).
-
Sign in with your Identity Provider:
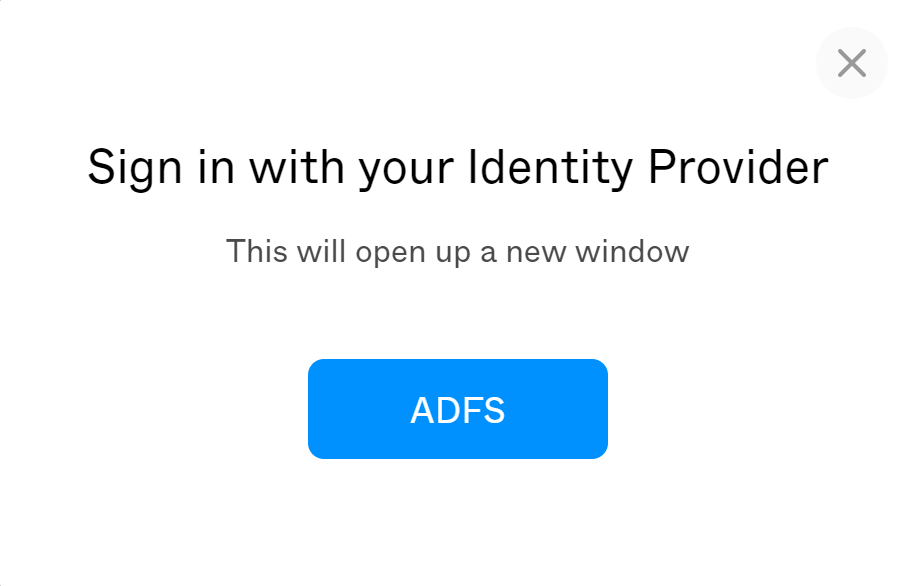
If your organization uses more than one Identity Provider, you see them all listed; choose the one you wish to authenticate with:

The name that appears on each button in the pop-up is the Name for the Identity Provider that is configured on Pexip Infinity.
-
If this is the first time you have used this Identity Provider, you are redirected to the Identity Provider where you must authenticate. This will usually be done via a new browser tab, which opens automatically. Otherwise, if you've already authenticated with the Identity Provider when accessing this or any other VMR, the authentication happens automatically using your previous credentials.
Occasionally (at a period determined by the Identity Provider) your authentication session will expire and you will need to re-authenticate.
- After successfully authenticating, you go straight into the meeting.
Joining with other devices
If authentication is enabled for a VMR or Virtual Auditorium, you can also determine how to treat participants attempting to join from devices other than Connect apps, such as SIP or H.323 endpoints. You do this via the Other participants setting, where you have options to either put all such devices into a waiting room, or allow these devices to bypass the waiting room, but only if they are locally registered (i.e. registered to a Conferencing Node in the same deployment that is hosting the VMR or VA they are attempting to access).
Note that although Connect apps can be registered, the Other participants setting does not apply to them.
For each Virtual Meeting Room or Virtual Auditorium:
-
if Other participants is set to Allowed if trusted:
- registered devices join the meeting directly (although they still need to enter a Host or Guest PIN if required)
- unregistered devices are placed in the waiting room;
-
if Other participants is set to Disallow all:
- both registered and unregistered devices are placed in the waiting room.
From the waiting room, participants must wait to be manually admitted to the conference by a meeting Host. Upon admission, they are not asked for a PIN and join as a Guest.
Authentication and PINs
VMRs and Virtual Auditoriums that require authentication can optionally use Host and Guest PINs.
For Connect app clients:
-
If PINs are configured:
- Participants need to enter the PIN before authenticating.
- The PIN that they enter determines whether they are a Host or a Guest, which then determines whether or not they need to authenticate, and if so, the Identity Providers to use.
- A participant who joins as a Guest can subsequently be escalated to a Host without authentication.
- If PINs are not configured, all users are treated as Hosts when authenticating.
For all other devices:
- If PINs are configured, and the device is locally registered, and Other participants is set to Allowed if trusted, the participant must enter a PIN before joining the meeting.
- If PINs are not configured, and the device is locally registered, and Other participants is set to Allowed if trusted, the participant joins the meeting automatically as a Host.
- In all other cases, the participant is held in a waiting room and must wait to be admitted to the meeting by a Host. They are not asked for a PIN and will join as a Guest.
Transferring participants
Participants can be transferred from one VMR into another VMR that requires authentication.
For participants using a supported Connect app:
- A participant can be transferred into a VMR that requires authentication only if the original VMR also required authentication and used the same Identity Provider as the destination VMR. The participant will not need to re-authenticate to join the destination VMR. If the original VMR did not require authentication, or the destination VMR uses a different identity provider, the transfer is not initiated and the participant remains in the original VMR.
- A participant can be transferred from a VMR that requires authentication into a VMR that does not require authentication. From there, a participant can be transferred into a third VMR that requires authentication only if that VMR uses the same Identity Provider as the original VMR; the participant does not need to re-authenticate in order to join the third VMR. Otherwise, the transfer is not initiated and the participant remains in the second VMR.
For other devices, when a participant using a locally-registered endpoint is transferred, if Other participants is set to Allowed if trusted the participant will join the meeting directly (although they will still need to enter a Host or Guest PIN if required). In all other cases, for both registered and unregistered devices, the transfer will fail and the participant will remain in the original VMR.
Display names
Each Identity Provider offers a given set of attributes for a user (such as their display name, given name, surname and email address).
For Virtual Meeting Rooms and Virtual Auditoriums that require participant authentication, the name shown for each participant (in the participant list, and as a text overlay when Show names of participants is enabled) depends on what is configured in the display name setting for the associated Identity Provider, as follows:
For SAML Identity Providers, the relevant field is Display Name Attribute Name.
- By default, the NameId attribute is used. This is the user's unique ID; what it contains depends on the Identity Provider.
- To use an attribute other than NameId, enter it here. Note that the format used varies depending on the Identity Provider.
- To use the name that participants entered themselves in their client, ensure this field is blank.
For OpenID Connect Identity Providers, the relevant field is Display Name Claim Name.
- By default, the Name attribute is used. This is the user's unique ID; what it contains depends on the Identity Provider.
- To use an attribute other than Name, enter it here. Note that the format used varies depending on the Identity Provider.
- To use the name that participants entered themselves in their client, ensure this field is blank.
When the display name is based on information provided by the Identity Provider, it cannot be changed by the participant, the meeting Host, or via the client API. However, it can be changed via participant policy.
Process for enabling Identity Providers
When setting up an Identity Provider, some configuration needs to be generated on Pexip Infinity and then added to the Identity Provider, and vice versa.
To make the setup easier, for SAML Identity Providers we have provided the ability to download a configuration file from Pexip Infinity which can be uploaded to the Identity Provider. You can also subsequently import some configuration from SAML and OIDC Identity Providers to Pexip Infinity.
In summary, the process is as follows:
- On Pexip Infinity, create the Identity Provider record and download the configuration. For full details see Adding Pexip Infinity service configuration.
- On the Identity Provider, create a new service and upload the Pexip Infinity configuration to it. For full details see Configuring individual SAML Identity Providers.
- Return to Pexip Infinity and either import the configuration file from the Identity Provider, or complete the configuration manually. For full details, see Adding the Identity Provider configuration to Pexip Infinity.
- On Pexip Infinity, add the Identity Provider to one or more Identity Provider Groups. For full details see Creating Identity Provider groups.
-
Configure individual Virtual Meeting Rooms and Virtual Auditoriums to use one of the Identity Provider Groups for participant authentication. For details, see Configuring Virtual Meeting Rooms (VMRs).
If your deployment uses Pexip's VMR Scheduling for Exchange feature, you can also require participant authentication for single-use VMRs
Adding Identity Providers to Pexip Infinity
An Identity Provider is the third-party service (such as ADFS, Microsoft Entra ID or Okta) with which users authenticate using Single Sign On (SSO) to access a VMR or Virtual Auditorium.
About redirect URLs
When configuring an Identity Provider, you must list one or more Redirect URLs that are valid for that provider. Redirect URLs are used in the authentication process to identify the source of a request, and also as an address to which the response to the request is returned. Redirect URLs must include the FQDN of the webapp as part of the URL.
If users in your deployment are able to access the web app from more than one FQDN, then you must configure each Identity Provider (both on Pexip Infinity and on the Identity Provider itself) with the same number of corresponding Redirect URLs. To help you, we have included an option to automatically add redirect URLs for every node FQDN used in your deployment. (Note that if you use this option, you still need to add the individual redirect URLs to your Identity Provider configuration.) You can also add additional redirect URLs manually from within the Advanced options section (available for both SAML and OpenID Connect).
Adding Pexip Infinity service configuration
The configuration for the Identity Provider is in two sections on Pexip Infinity.
Firstly, go to and select . Complete the section, as follows:
| Option | Description |
|---|---|
| Service configuration | |
| Name |
The name used to refer to this Identity Provider. This name will be visible to end users, so you should use a name that will help users differentiate between Identity Providers without compromising security. |
| Description | An optional description of the Identity Provider. |
| A unique identifier for this Identity Provider configuration. A value is automatically assigned and there is normally no need to modify it. | |
| Identity Provider protocol |
Select the protocol used by this Identity Provider:
The remaining configuration fields depend on the option selected here. |
| SAML options (available when an Identity Provider type of SAML is selected) | |
| Certificate | Certificate used by Pexip Infinity when communicating with the Identity Provider. |
| Private key | Private key used by Pexip Infinity when communicating with the Identity Provider. |
| Redirect URL |
This should be in the format: https://<webapp_FQDN>/api/v1/samlconsumer/<uuid> where <webapp_FQDN> is the FQDN from which the web app is accessed, and <uuid> is the UUID You should provide one Redirect URL for every web app FQDN used in your deployment; Additional redirect URLs can be added from the Advanced options (available for both SAML and OpenID Connect): section below. For more information, see About redirect URLs. |
| SAML 2.0 Entity ID for this service | An identifier for the service on Pexip Infinity. We recommend that you use the FQDN from which the web app is accessed, for consistency. |
| Signature algorithm | Signature algorithm used to sign SAML authentication request messages and service metadata |
| Digest algorithm | Digest algorithm used to sign SAML authentication request messages and service metadata |
| OpenID Connect options (available when an Identity Provider type of OpenID Connect is selected) | |
| OpenID Connect flow | Select the flow used by the OpenID Connect Identity Provider. |
| OpenID Connect client identifier | The client identifier provided by the OpenID Connect Identity Provider. |
| OpenID Connect client secret | The client secret provided by the OpenID Connect Identity Provider. |
| Redirect URL |
This should be in the format: https://<webapp_FQDN>/api/v1/oidcconsumer/<uuid> where <webapp_FQDN> is the FQDN from which the web app is accessed, and <uuid> is the UUID You should provide one Redirect URL for every web app FQDN used in your deployment; Additional redirect URLs can be added from the Advanced options (available for both SAML and OpenID Connect): section below. For more information, see About redirect URLs. |
| Advanced options (available for both SAML and OpenID Connect): | |
| Create redirect URLs from Conferencing Node FQDNs | Automatically generate allowed redirect URLs from the configured FQDNs for each Conferencing Node. |
| Additional redirect URL | Enter any additional redirect URLs valid for use with this Identity Provider. |
| Attributes |
Identity Provider attributes are custom attributes that are associated with an Identity Provider and that have been created to support a specific business need (for example whether somebody is a member of a particular group of people). The attributes you assign here are made available to any local or external participant policy, when the participant uses this provider for authentication. These attributes can then be used in the participant policy decision-making process (for example whether to accept or reject a call, or assign a specific role). Managing the available attributes To create a new attribute, select The Name entered here must match the associated name in your Identity Provider configuration. You can also go to to directly create, modify or delete any attributes. Assigning an attribute Select from the list of Available Attributes the set of attributes to associated with this Identity Provider and then use the right arrow to move the selected attribute into the Chosen Attributes list. |
| Advanced options available for SAML only: | |
| Download service metadata |
(Available when saved) This option allows you to download the configuration in a format that can be imported by the Identity Provider. |
| Advanced options available for OpenID Connect only: | |
| OpenID Connect Token Endpoint authentication type | The authentication method used by Pexip Infinity to authenticate when using the token endpoint. |
| OpenID Connect JWT signature scheme | The algorithm used by the Identity Provider to sign the contents of the token. |
| OpenID Connect UserInfo Endpoint URL | You can optionally enter here the URL of an OpenID Connect UserInfo Endpoint if you wish to use the UserInfo Endpoint (rather than the JWT) to retrieve information about the user such as their display name. |
| eIDAS authentication |
The eIDAS level to use in requests and responses. This should not be changed from the default Disabled unless advised by Pexip support. |
 and then enter the
 Configuring the Identity Provider
The next step is to create a new service on the Identity Provider and configure it with details of Pexip Infinity.
All Identity Providers can be configured manually, but some SAML Identity Providers also allow you to upload configuration that has been exported from Pexip Infinity. To do this:
- On Pexip Infinity go to and select the SAML Identity Provider you have just created.
- At the bottom of the page select .
- Download the file and import it to the Identity Provider.
For full step-by-step instructions on configuring the main supported Identity Providers, see Configuring individual SAML Identity Providers.
Adding the Identity Provider configuration to Pexip Infinity
After you have configured the Identity Provider, you must add its configuration to Pexip Infinity. Some Identity Providers will have provided the option to download a configuration file in XML format (for SAML) or JSON (for OpenID Connect); you have the option to upload this to Pexip Infinity. Note that this will not include the configuration for the display name; this must be done manually.
To complete the configuration, on Pexip Infinity, go back to and select the Identity Provider. Under the section, complete the following fields (the individual Identity Provider configuration instructions explain where to find this information for each Identity Provider).
Note that the available fields differ between SAML Identity Providers and OpenID Connect Identity Providers:
SAML Identity Provider configuration
OpenID Connect Identity Provider configuration
Creating Identity Provider groups
Each Identity Provider must belong to at least one Identity Provider group in order to be used.
- An Identity Provider group can contain just a single Identity Provider — for example, if you use only one Identity Provider in your deployment, or if you wish to restrict access to certain VMRs to participants who have authenticated with a particular Identity Provider.
- A group can contain more than one Identity Provider — for example, you may have more than one Identity Provider in use within your enterprise, and you wish users from some or all of them to be able to access the same SSO-protected VMRs.
- An Identity Provider can belong to more than one Identity Provider group. For example, you might have one Identity Provider group that contains all the Identity Providers in your enterprise, and other Identity Provider groups that contain subsets of those Identity Providers, or just a single Identity Provider.
To create an Identity Provider group, go to and complete the following fields:
| Option | Description |
|---|---|
| Name | The name used to refer to this Identity Provider Group. |
| Description | An optional description of the Identity Provider Group. |
| Identity Providers | From the list of configured Identity Providers, select one or more Identity Providers to add to this Identity Provider Group. |