Migrating from EWS API to Graph API for One-Touch Join
This topic describes how to migrate from an existing One-Touch Join deployment for Office 365 that uses the EWS API to access calendars used for OTJ, to one that uses Microsoft Azure and the Exchange Graph API to access those calendars.
We previously supported One-Touch Join deployments for Office 365 that used a service account with application impersonation to read OTJ calendars. This service account authenticated using OAuth and used the EWS API to access mailboxes. However, the EWS API is being deprecated by Microsoft, after which any deployments that use the EWS API will no longer work. These deployments must be migrated to use the Graph API to provide access to room resource mailboxes.
For reference, the previous instructions on configuring an Office 365 environment using OAuth and the EWS API is available on our v34 documentation website.
The migration process involves the following steps:
- Creating and configuring a new App registration in Azure.
- Restricting the scope of the App registration.
- Confirming calendar processing settings for room resources.
- Creating an associated O365 Graph integration on Pexip Infinity.
- Swapping integrations from EWS to Graph.
Prerequisites
When migrating from EWS API to Graph API, you do not need to change your existing OTJ Endpoint configuration or email addresses.
Before you begin, ensure that the following configuration is complete:
- Ensure each physical room that will have a One-Touch Join endpoint in it has an associated room resource with an email address.
- Enable auto calendar processing for each room resource, so that the room will automatically accept meeting requests if it is available, and automatically decline an invitation if it is already booked.
- We recommend that if you are using Safe Links, you modify your Safe Links policy so that URLs are not rewritten in any meeting invitations sent to room resources used by One-Touch Join endpoints.
- Ensure you have access to the Azure portal, using an account that can grant admin consent.
- Ensure you have admin access to your Office 365 web interface, and access to the Microsoft Exchange Online and Azure Active Directory Modules for Windows PowerShell. (If you are connecting from your Windows PC for the first time, you may need to install these modules. See these Microsoft articles about connecting to Exchange online and Microsoft 365 with PowerShell for more information.)
In this step, you create an App registration in Azure for the OTJ service, and grant it permission to read calendars. (In a subsequent step you will restrict the app to read OTJ calendars only.)
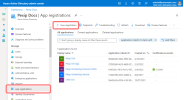
- Log into the Azure portal at aad.portal.azure.com as an admin user.
- From the main panel on the left, select .
-
Select and then :
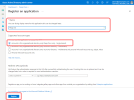
- In the Register an application panel, enter the following options:
- Name: this can be anything you wish. In our example we have used Pexip OTJ.
- Supported account types: select the option most appropriate for your environment. In most cases, the default Accounts in this organizational directory only can be used.
Redirect URI: leave this blank.
-
Select .
You can now configure your application.
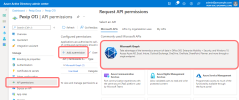
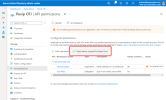
- From the panel on the left, select and then .
-
Select :
-
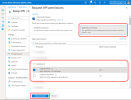
Select . Scroll down to , expand it, and select Calendars.Read. Then select :
-
Select :
-
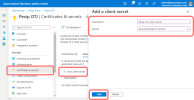
From the panel on the left, select and then .
-
Enter a Description. Under Expires select a duration in accordance with your organization's security policies, and select :
-
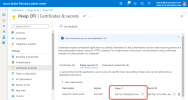
The new client secret will appear in the list at the bottom of the page. You must copy the Value now, before you navigate away from the page:
You must enter this as the Client secret when adding an O365 Graph integration on Pexip Infinity.
-
Go to the overview page for the App registration you have just created and copy the
You must enter this as the Client ID when adding an O365 Graph integration on Pexip Infinity.
-
Select the tab and copy the value:
You must enter this as the OAuth 2.0 token endpoint URL when adding an O365 Graph integration on Pexip Infinity.
Next you need to obtain the client secret.
In this step, you create a group for the room resources to be used for One-Touch Join, and then restrict the App to only read these calendars.
Your existing EWS deployment uses a Distribution list group that contains the rooms to be used for One-Touch Join. When migrating to Graph, you must create a Mail-enabled security group instead.
Creating a mail-enabled security group
-
Go to admin.microsoft.com and log in as the administrator.
- From the menu on the left hand side, select Active teams & groups and then Add a group.
- For the Group Type, select Mail-enabled security. Select .
- Enter a Name and Description. Select .
-
Enter a Group email address. Leave the Communication checkbox clear.
Select .
-
Select .
-
Navigate back to Active teams & groups, select the tab, and then select the group you have just created. From the panel on the right, select the tab and then .
-
Add as members of the group the resources to be used for One-Touch Join. These will be the only calendars that the OTJ App will be able to read.
Changes to application access policies (such as creating and adding members to a Mail-enabled security group as described above) can take over an hour to take effect (see Microsoft's documentation).
Restricting access
Open up a remote PowerShell connection to Office 365 and import an Exchange session. For example see https://docs.microsoft.com/en-us/powershell/exchange/connect-to-exchange-online-powershell?view=exchange-ps
Run the following command, using the following values:
- AppId: the that was generated by Azure when you created the OTJ Graph API application.
- PolicyScopeGroupId: the email of the mail-enabled security group containing the One-Touch Join resources.
- Description: a description of the access policy.
For example:
New-ApplicationAccessPolicy -AppId e7e4dbfc-046f-4074-9b3b-2ae8f144f59b -PolicyScopeGroupId otjrooms@pexample.com -AccessRight RestrictAccess -Description "Restrict this app to members of distribution group otjrooms."
When setting up your existing EWS deployment you changed the calendar processing settings for room resources from the default to those required to support One-Touch Join. You don't need to make any further changes when migrating to Graph, but you should check that the settings are as expected.
Checking calendar processing settings
The following PowerShell command can be used to check calendar processing settings on all of the rooms in the mail-enabled security group that was created for One-Touch Join.
We recommend copying and saving this as a file and running it from within PowerShell.
Before running, ensure that you edit $otj_group_id = "otjrooms@example.com" to use the email of the
$deleted_subjects = @()
$organizer_added = @()
$deleted_bodies = @()
$private_flag_reset = @()
$not_auto_accept = @()
$process_external = @()
$otj_group_id = "otjrooms@example.com"

Get-DistributionGroupMember -Identity $otj_group_id -ResultSize Unlimited | ForEach-Object {
    Write-Host "Checking room '$($_.name)'"
    $processing = Get-CalendarProcessing -Identity $_.name
    $pass = $true
    if ($processing.DeleteSubject) {
        Write-Host "WARNING: The room '$($_.name)' is deleting the meeting subject" -ForegroundColor Red
        $deleted_subjects += $_.name
        $pass = $false
    }
    if ($processing.AddOrganizerToSubject) {
        Write-Host "WARNING: The room '$($_.name)' is adding the organizer to the meeting subject" -ForegroundColor Red
        $organizer_added += $_.name
        $pass = $false
    }
    if ($processing.DeleteComments) {
        Write-Host "WARNING: The room '$($_.name)' is deleting the meeting body" -ForegroundColor Red
        $deleted_bodies += $_.name
        $pass = $false
    }
    if ($processing.RemovePrivateProperty) {
        Write-Host "WARNING: The room '$($_.name)' is clearing the private flag on meetings" -ForegroundColor Red
        $private_flag_reset += $_.name
        $pass = $false
    }
    if ($processing.AutomateProcessing -ne "AutoAccept") {
        Write-Host "WARNING: The room '$($_.name)' is not configured to Auto Accept. Processing='$($processing.AutomateProcessing)'" -ForegroundColor Red
        $not_auto_accept += $_.name
        $pass = $false
    }
    # Optional permission for allowing the external invites:
    if ($processing.ProcessExternalMeetingMessages) {
        Write-Host "The room '$($_.name)' is configured to process external (forwarded) meetings"
        $process_external += $_.name
    }
    if ($pass) {
        Write-Host "INFO: All checks passed for room '$($_.name)'" -ForegroundColor Green
    }
}

Write-Host "Summary:"
Write-Host "There are $($deleted_subjects.count) rooms deleting the meeting subject"
    if ($deleted_subjects) {
        Write-Host $deleted_subjects -Separator ", "
        Write-Host ""
}
Write-Host "There are $($organizer_added.count) rooms adding the organizer to the meeting subject"
    if ($organizer_added) {
        Write-Host $organizer_added -Separator ", "
        Write-Host ""
}
Write-Host "There are $($deleted_bodies.count) rooms deleting the meeting body"
    if ($deleted_bodies) {
        Write-Host $deleted_bodies -Separator ", "
        Write-Host ""
}
Write-Host "There are $($private_flag_reset.count) rooms clearing the private flag on meetings"
    if ($private_flag_reset) {
        Write-Host $private_flag_reset -Separator ", "
        Write-Host ""
}
Write-Host "There are $($not_auto_accept.count) rooms not configured to Auto Accept"
    if ($not_auto_accept) {
        Write-Host $not_auto_accept -Separator ", "
        Write-Host ""
}
Write-Host "There are $($process_external.count) rooms configured to process external (forwarded) meetings"
    if ($process_external) {
        Write-Host $process_external -Separator ", "
        Write-Host ""
}
In this step you log in to the Pexip Infinity Administrator interface and add details of the Graph API application you have just configured.
Configuring the O365 Graph integration
From the Pexip Infinity Administrator interface, go to .
| Option | Description |
|---|---|
| Name | The name of this One-Touch Join O365 Graph integration. |
| Description | An optional description of this One-Touch Join O365 Graph integration. |
| Client ID |
The Application (client) ID which was generated by Azure when you created the OTJ Graph API application (see Creating and configuring a new App registration in Azure). This is available in Azure under App Registrations, by selecting the application and viewing the Essentials section. |
| Client secret |
The client secret of the OTJ Graph API application. If you didn't copy this at the time the registration was created, you'll need to generate a new one. |
| OAuth 2.0 token endpoint URL |
The URL of the OAuth 2.0 (v2) token endpoint for this OTJ Graph API application. This is available in Azure under App Registrations, by selecting the application and then selecting the Endpoints tab. |
| Advanced options | |
| Maximum Graph API requests |
The maximum number of API requests that can be made by OTJ to the Microsoft Graph API in a 24-hour period. The default of 1,000,000 should be sufficient for most deployments — for more information, see Frequency of and limitations on calendar requests. We do not recommend increasing this quota unless you have deployed a dedicated One-Touch Join platform, because it will impact the performance of the Conferencing Nodes. |
| Graph API FQDN | The FQDN to use when connecting to the Graph API. |
In this step you update your existing deployment to use the new Graph integration.
Changes to application access policies (such as those required previously when creating and adding members to a Mail-enabled security group) can take over an hour to take effect (see Microsoft's documentation). We therefore recommend that to ensure continuity of service, you confirm that the relevant Mail-enabled security group has been updated with the correct members before completing this final step.
When you created your existing deployment you configured the necessary One-Touch Join components on Pexip Infinity (OTJ Profile, OTJ Endpoints, OTJ Endpoint Groups, Meeting Processing Rules), as described in Configuring Pexip Infinity for One-Touch Join. You don't need to change the endpoints, endpoint groups or rules, but you do need to update your existing OTJ Profile to use the new Graph integration instead of the existing EWS Exchange integration. To do this:
- From select the existing OTJ profile.
- From the Exchange Integration drop-down menu, clear the existing selection.
- From the Graph Integration drop-down menu, select the new Graph integration you have just created.
- Select .
