Deploying the reverse proxy and TURN server using an OVA template
Pexip provides a preconfigured Reverse Proxy and TURN Server appliance via an OVA template suitable for deployment on VMware ESXi. This OVA template is provided "as-is" and provides a reference installation which is suitable for typical Pexip deployments where:
- Conferencing Nodes are deployed in internal, private networks.
- The reverse proxy and TURN server is deployed in a DMZ environment using one or two network interfaces.
If you are using v5 (or earlier) of the OVA template, refer to the previous documentation for the appropriate instructions.
The Reverse Proxy and TURN Server appliance is also available as an Amazon Machine Image (AMI) on Amazon Web Services (AWS). When choosing your AMI, select , search for "Pexip" and select the Pexip Reverse Proxy.
Deployment steps
These steps involve:
- Downloading the OVA template
- Deploying the OVA template
- Setting the password for SSH/console access
- Running the installation wizard
Downloading the OVA template
Download the latest version 7.1 of the Pexip RP/TURN OVA template from https://dl.pexip.com/rpturn/index.html (select the v7.1 directory) to the PC running the vSphere web client.
We recommend that you verify the OVA file integrity after downloading the OVA file by calculating the SHA256 sum of the downloaded file and comparing that with the respective SHA256 sum found in the readme.txt file (located in the same download location as the OVA images).
See Reverse Proxy and TURN Server release notes for the latest information on new features and resolved issues.
Deploying the OVA template

We recommend 2 cores and 2 GB RAM for the host server VM.
To deploy the OVA template:
- Using the vSphere web client, go to , click and (this option accepts OVA files).
- During the OVA deployment, we recommend that you use the default options. Also make sure to assign the correct VMware network/port group for the network interface of the virtual machine.
- After the OVA template has been deployed, power on the newly-created virtual machine.
Setting the password for SSH/console access
After the virtual machine has powered on, open a console for the Reverse Proxy and TURN Server virtual machine.

Initial login prompt
Before you can start the install wizard, you must change the password. To do this:
- Log in as user pexip with password PEXIP (these are case sensitive).
-
You are prompted to set a new account password. To do this you must enter the new password twice. The password must:
- have a minimum of 8 characters
-
satisfy at least 3 out of the following 4 conditions:
- one lower case character
- one upper case character
- one special character
- one digit.
- After setting the new password, the install wizard starts and you log in again with the new password.
Running the installation wizard
The installation wizard is divided into several steps, which are explained below. Some steps are only presented if they are appropriate — for example, if dual network interfaces are detected, or if you choose to enable the TURN server.
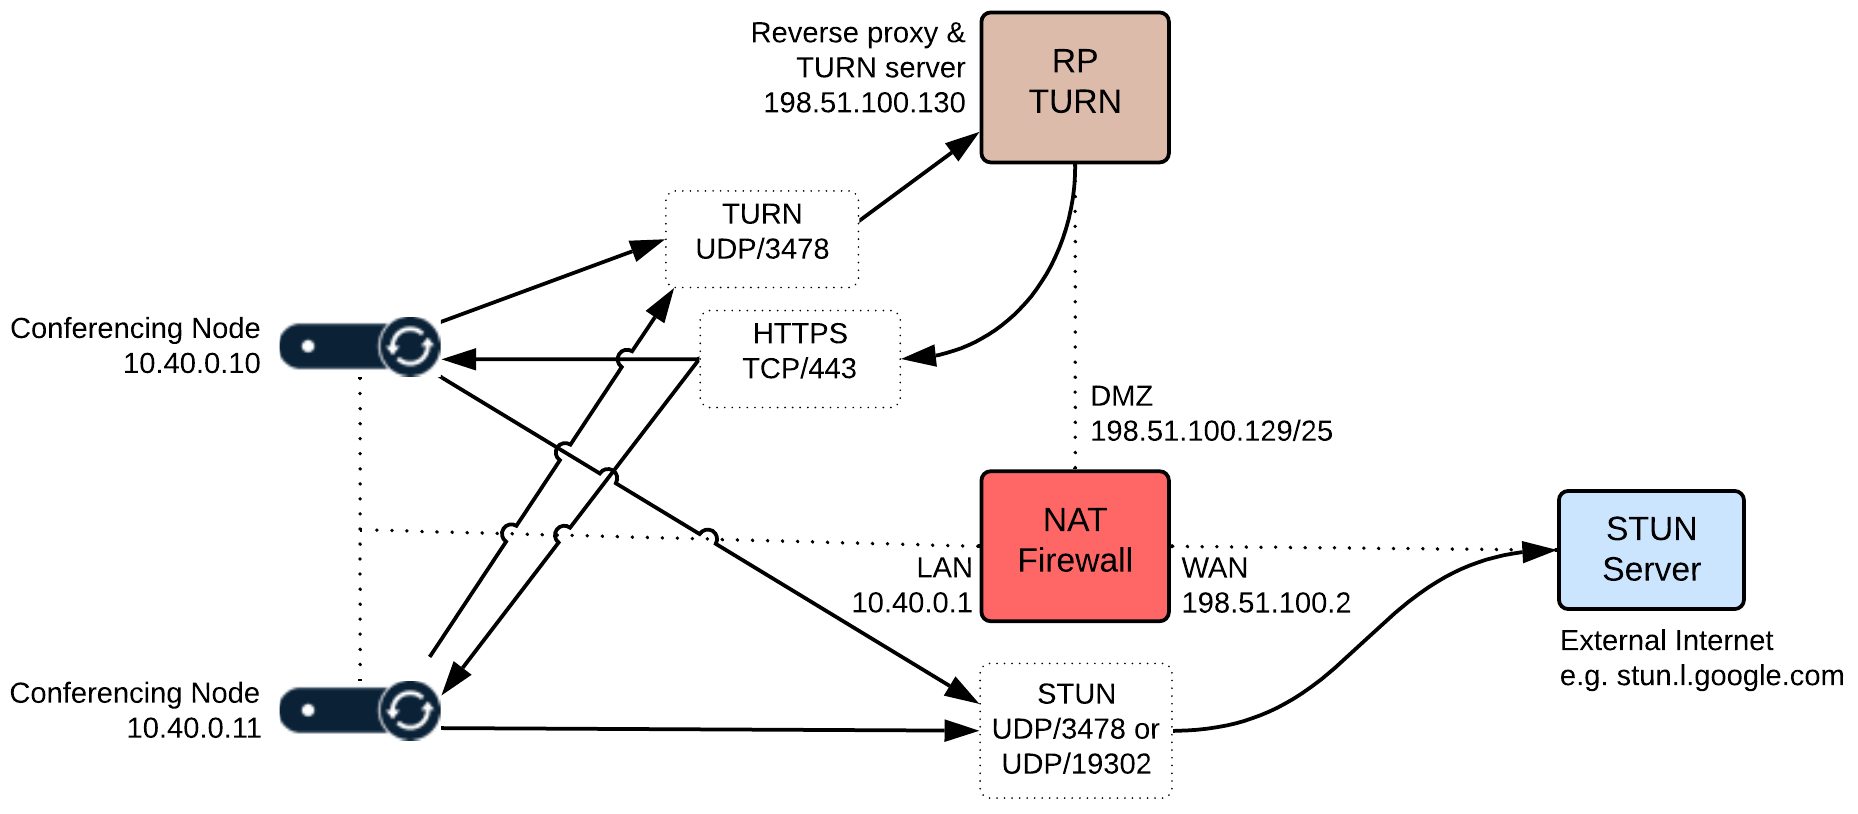
The example configuration values described here are based on the Example reverse proxy / TURN server deployment: single NIC on public address
- The reverse proxy and TURN server interface (198.51.100.130) resides in the same subnet as its default gateway (198.51.100.129).
- Router 10.40.0.1 is the next hop when accessing all internal hosts. The internal networks are defined by CIDR 10.0.0.0/8 (10.0.0.0-10.255.255.255).
- Hosts residing in the internal network 10.0.50.0/24 will access the reverse proxy and the TURN server over SSH.
Note that all IP addresses in this guide are examples only — actual IP addressing is deployment specific.
The following table shows, for each step, the prompt text that is shown, an explanation of the step and some example input. If you subsequently rerun the installation wizard, the default values for the questions use the answers from the previous run (if they are still valid).
| Step / Wizard prompt text | Example value | Description | ||
|---|---|---|---|---|
| 1 | Network / NIC configuration | |||
| Single NIC — these steps only apply if dual NICs are not detected, otherwise skip to dual NICs detected. In the example single NIC deployment scenario shown above, this step would be presented. | ||||
| 1.1 | IP Address? | 198.51.100.130 |
The IP address of the appliance. Defaults to a value suggested by DHCP if available. |
|
| 1.2 | Netmask? | 255.255.0.0 |
The network mask for the appliance. Defaults to a value suggested by DHCP if available. |
|
| 1.3 | Default gateway? | 198.51.100.129 |
The IP address of the appliance's default gateway. Now skip to step 2 DNS servers. |
|
| Dual NICs detected | ||||
| 1.4 | <list of detected NICs> Do you want to configure Dual NIC? |
This step only applies if 2 or more network interfaces are detected on the underlying virtual machine. In the example deployment scenario shown above, this step would not be presented. Values: yes/no Default: no |
||
| If Dual NICs are available but not selected (answer = no): | ||||
| 1.5 | Which network interface should be used? |
Enter a NIC from the printed list (e.g. nic0) to be used as the (single) interface for the appliance. Then proceed as for a single NIC deployment above (step 1.1). |
||
| If Dual NICs are available and selected (answer = yes): | ||||
| 1.6 | Which is the internal-facing network interface? |
Enter the name of the internal-facing network interface. Values: expects a NIC from the printed list (e.g. nic0). |
||
| 1.7 | Which is the external-facing network interface? |
Enter the name of the external-facing network interface. It automatically fills out the answer if one NIC is left, otherwise it expects a NIC from the list which has not already been chosen (e.g. nic1). |
||
| In this case, steps 2 and 3 of the wizard now capture the interface addresses: | ||||
| 2.1 | IP Address for internal interface? |
The IP address of the internal interface of the appliance (e.g. 10.44.0.5). Defaults to a value suggested by DHCP if available. |
||
| 2.2 | Subnet mask for internal interface? |
The network mask for the internal interface (e.g. 255.255.0.0) Defaults to a value suggested by DHCP if available. |
||
| 2.3 | Add a custom network route for <internal NIC>? |
Values: yes/no Default: no If "yes" you are prompted with:
If you are rerunning the wizard, and you previously entered some custom routes, the previous routes are listed and you are asked "Use these default values?" instead. Reply "yes" (default) to reuse the previous routes, or "no" to change the routes via this step. |
||
| 3.1 | IP Address for external interface? |
The IP address of the external interface of the appliance (e.g. 198.51.100.130). Defaults to a value suggested by DHCP if available. |
||
| 3.2 | Subnet mask for external interface? |
The network mask for the external interface (e.g. 255.255.0.0) Defaults to a value suggested by DHCP if available. |
||
| 3.3 | Default gateway for external interface? | The address of the appliance's default gateway (e.g. 198.51.100.129). | ||
| After configuring dual NICs, the remaining step numbers are now as shown below + 2, e.g. DNS servers becomes step 4 and so on. | ||||
| 2 | DNS servers | |||
| 2.1 |
<list of default DNS servers found> Use these default values? |
yes |
This step only applies if DNS servers were saved from a previous run or detected from DHCP. Values: yes/no Default: yes |
|
| 2.2 | DNS server 1 |
This step only applies if not using the default DNS servers. Enter an IP address (e.g. 10.44.0.9) or an empty line. The question is repeated ("DNS server 2" etc) until an empty line is received. At least one DNS server must be configured. DNS is mainly used to resolve the hostnames of NTP servers. |
||
| 3 | Hostname and Domain | |||
| 3.1 | Hostname? | proxy |
The hostname of the appliance. The hostname and domain (configured in the next step) must match the actual DNS name by which the appliance will be addressed. |
|
| 3.2 | Domain? | example.com |
The domain suffix of the appliance. This means that if the host name in the previous step was configured as proxy, that the full FQDN of this appliance is proxy.example.com. Defaults to a value suggested by DHCP if available. If a custom SSL certificate is created for the reverse proxy, this FQDN needs to match the Subject Name and Subject Alternative Name of the SSL certificate. For more information, see Replacing the default SSL certificate on the reverse proxy. |
|
| 4 | NTP servers | |||
| 4.1 |
<list of default NTP servers> Use these default values? |
yes |
We recommend that at least three NTP servers are used to ensure proper NTP time synchronization. The default list of NTP servers is 0.pexip.pool.ntp.org, 1.pexip.pool.ntp.org, 2.pexip.pool.ntp.org. Values: yes/no Default: yes |
|
| 4.2 | NTP server 1 |
This step only applies if not using the default NTP servers. Enter an IP address (e.g. 10.44.0.5), an FQDN (e.g. 0.pexip.pool.ntp.org), or an empty line. The question is repeated ("NTP server 2" etc) until an empty line is received. At least one NTP server must be configured. |
||
| 5 | Web reverse proxy | |||
| 5.1 | Enable web reverse proxy? | yes |
This step determines if the reverse proxy functionality is enabled. Values: yes/no Default: yes If "no", skip to step 6 TURN server. |
|
| 5.2 | IP Address of signaling Conferencing Node 1? | 10.40.0.10 [ENTER] 10.40.0.11 [ENTER] [ENTER] |
Specify the Conferencing Nodes that will receive the proxied HTTPS (signaling) requests. Enter the IP address of a Pexip Conferencing Node or an empty line when finished. We recommend that these nodes are configured as Transcoding Conferencing Nodes. The question is repeated ("Conferencing Node 2" etc) until an empty line is received. At least one Conferencing Node must be configured. If you are rerunning the wizard, and you previously entered some node addresses, the previous addresses are listed and you are asked "Use these default values?" instead. Reply "yes" (default) to reuse the previous addresses, or "no" to change the addresses via this step. |
|
| 5.3 | <CSP information message> Enable Content Security Policy? |
yes |
Content-Security-Policy is an HTTP header that provides enhanced security against cross-site scripting attacks. Values: yes/no Default: yes Enter 'yes' to enable Content Security Policy. This is recommended if you are not using optional advanced features such as plugins for Connect app, externally-hosted branding, or externally-hosted pexrtc.js in your Pexip deployment. Enter 'no' for best compatibility with these optional advanced features, otherwise we recommend that you enable this option. |
|
| 6 | TURN server | |||
| 6.1 | Enable TURN server? | yes |
If you answered "no" to "Enable web reverse proxy?", this question is skipped and the TURN server is enabled by default. In our example deployment, this question is asked and the answer is "yes". Values: yes/no Default: yes |
|
| 6.2 | Do you want the TURN server to listen on port 443 instead of 3478? | no |
This only applies if you answered "no" to "Enable web reverse proxy?". It allows you to configure the TURN server to listen on port 443 instead of 3478. In our example deployment the answer is "no". See Configuring the TURN server for TCP TURN relay for more information. Values: yes/no Default: no |
|
| 6.3 | Do you want to configure TURN using the restricted configuration mode? | yes |
Values: yes/no Default: yes If "no", skip to step 6.7. |
|
| 6.4 | Username? | pexip |
This only applies if using restricted mode. The username and password are the credentials you must use when configuring Pexip Infinity with the access details for this TURN server. A username must be entered. |
|
| 6.5 | Password? | admin123 |
This only applies if using restricted mode. A password must be entered. If you subsequently rerun the installation wizard you must resupply this password. |
|
| 6.6 | IP Address of media Conferencing Node 1? |
This only applies if using restricted mode. Specify the addresses of the Conferencing Nodes that will use this TURN server for media relay. Only the addresses specified here will be allowed (safelisted) to communicate with the TURN server over UDP/3478. Enter the IP address of a Pexip Conferencing Node or an empty line when finished. The question is repeated ("Conferencing Node 2" etc) until an empty line is received. At least one Conferencing Node must be configured. This defaults to the list provided for the IP Address of signaling Conferencing Nodes step, if that question was asked. If you are rerunning the wizard, and you previously entered some node addresses, the previous addresses are listed and you are asked "Use these default values?" instead. Reply "yes" (default) to reuse the previous addresses, or "no" to change the addresses via this step. If you later add more Conferencing Nodes to your platform, and those nodes need to use this TURN server, you will need to rerun the wizard and add the addresses of those new nodes. |
||
| 6.7 | TURN secret key |
This only applies if using permissive mode. In permissive mode, a TURN secret key must be used for authentication. You can enter your own key, or just press Enter and it will generate (and display) a key for you. When configuring the TURN server in Pexip Infinity, use a TURN server type of Time-limited credentials (instead of a username and password) and enter the key as the Shared secret. |
||
| 7 | Management networks (IP tables rules for SSH access) | |||
| 7.1 | Add a management network? | yes |
This allows the enterprise's management network to access this host over SSH. Values: yes/no Default: yes If you are rerunning the wizard, and you previously entered some management networks, the previous networks are listed and you are asked "Use these default values?" instead. Reply "yes" (default) to reuse the previous networks, or "no" to change the networks via this step. If "no" skip to step 8 Fail2ban. Note that the SSH service is disabled if no management networks are configured. |
|
| 7.2 | IP Address for the management network 1? | 10.0.50.0 | Enter a base IP address. You can also supply an address in CIDR format (e.g. 10.0.50.0/24), in which case the following netmask question is skipped. | |
| 7.3 | Netmask for management network 1? | 255.255.255.0 | The network mask for the management network. | |
| 7.4 | Add another management network? | no | Enter "yes" to add another network (jumps back to "IP Address for the management network?"), or "no" to continue on to the next step. | |
| 8 | Fail2ban | |||
| 8.1 | Enable Fail2ban? |
Fail2ban is an intrusion prevention framework that can protect the reverse proxy from brute-force attacks on PIN-protected conferences. Values: yes/no Default: no See Enabling fail2ban on the reverse proxy for more information. |
||
| 9 | SNMPv2c | |||
| 9.1 | Enable SNMPv2c read only? |
Enables SNMPv2c read only access. Values: yes/no Default: no If "no", skip to step 10 certificates. |
||
| 9.2 | SNMP community? |
The SNMP trap community name. Default: public |
||
| 9.3 | SNMP system location? | A description of the appliance's location. | ||
| 9.4 | SNMP system contact? | The contact details (for example, email address) of the person responsible for this particular appliance. | ||
| 9.5 | SNMP system name? | A name for this appliance. | ||
| 9.6 | SNMP system description? | A description for this appliance. | ||
| 10 | Certificates (these steps only apply if you are rerunning the installation wizard; on the first run, the certificates are regenerated without asking) | |||
| 10.1 | Do you want to regenerate a new SSL certificate? |
The SSL certificate is used when accessing conferencing services. Values: yes/no Default: yes See Replacing the default SSL certificate on the reverse proxy for instructions on how to upload your own TLS certificate. If you have uploaded your own SSL certificate and do not want it to be replaced, ensure that you answer "no" to this option. |
||
| 10.2 | Do you want to regenerate a new SSH certificate? |
The SSH certificate is used when connecting over SSH for maintenance tasks. Values: yes/no Default: yes |
||
When all of the installation wizard steps have been completed, the appliance will automatically reboot.
After the appliance has started up again it will be ready for use — Connect app users can now access VMRs from outside your network.