Configuring Pexip Infinity for VMR Scheduling for Exchange
The VMR Scheduling for Exchange feature allows you to create an add-in that enables Microsoft Outlook desktop and Web App users in Office 365 or Exchange environments to schedule meetings using Pexip VMRs as a meeting resource.
The first step in enabling VMR Scheduling for Exchange is Configuring Exchange on-premises for scheduling. You must do that before you can complete the following configuration on the Pexip Infinity Management Node.
Adding a VMR scheduling for Exchange integration to Pexip Infinity and generating the add-in file
A VMR scheduling for Exchange integration defines a specific connection between your Pexip Infinity deployment and a Microsoft Exchange deployment. In some cases a single Pexip Infinity deployment will have more than one VMR scheduling for Exchange integration. Adding a new VMR scheduling for Exchange integration involves the following steps:
- add details of your Microsoft Exchange deployment and accounts to your Pexip Infinity deployment
- configure the aliases that will be used for VMRs created using the VMR Scheduling for Exchange service
- configure the text used by the add-in
- generate the add-in file.
From the Pexip Infinity Management Node go to and complete the following fields:
| Option | Description |
|---|---|
| Name | The name used to refer to this VMR scheduling for Exchange integration. |
| Description | An optional description of this VMR scheduling for Exchange integration. |
| Exchange server information | |
| EWS URL |
The URL used to connect to Exchange Web Services (EWS) on the Microsoft Exchange server.
|
| Service account username |
The username of the service account to be used by this VMR scheduling for Exchange integration. This is the username you assigned when Creating a service account for Exchange on-premises or Creating a service account for O365. For Office365 deployments, the format is usually name@example.com; for on-premises deployments, the format may be either example\name or name@example.com, depending on your domain. A single service account can be used by more than one VMR scheduling for Exchange integration. |
| Enable OAuth |
Enable this option to authenticate the service account using OAuth 2.0. This option is only supported for Exchange in Office 365. Leave this option disabled to continue using Basic Auth. If you select this option, you must sign in to the service account after completing and saving your configuration. As of H2 2021, Microsoft will stop supporting and fully decommission Basic Authentication for EWS to access Exchange Online (for more information, see Microsoft's announcement). We therefore strongly recommend that for Office 365, all new deployments authenticate the service account using OAuth 2.0, and all existing deployments are updated to enable this option as soon as possible. |
| OAuth client ID |
(Available if OAuth has been enabled) Enter the Application (client) ID that was generated for you by Azure when you saved the App Registration (see Taking note of configuration). |
| OAuth redirect URI |
(Available if OAuth has been enabled) Enter the Redirect URI that you used when Enabling OAuth authentication for Office 365. This should be in the format https://<Management Node Address>/admin/platform/msexchangeconnector/oauth_redirect/. The OAuth redirect URI is the URI to which you will be returned after you have successfully signed in to the service account. It must be the same on Azure and Pexip Infinity in order for Azure to validate the sign-in request. |
| OAuth authorization endpoint |
(Available if OAuth has been enabled) Enter the URL of the OAuth 2.0 authorization endpoint (v1) (see Taking note of configuration). Ensure that you use the URL for ... endpoint (v1), not ... endpoint (v2). |
| OAuth token endpoint |
(Available if OAuth has been enabled) URL of the OAuth 2.0 token endpoint (v1) (see Taking note of configuration). Ensure that you use the URL for ... endpoint (v1), not ... endpoint (v2). |
| Service account password |
(Available if OAuth has not been enabled) The password of the service account to be used by this VMR scheduling for Exchange integration. This is the password you assigned when Creating a service account. |
| Mailbox name |
The name of the equipment resource that is to be used by this VMR scheduling for Exchange integration. This is the name you assigned when Creating an equipment resource in Exchange on-premises or Creating an equipment resource in O365. An equipment mailbox must only be used by a single VMR scheduling for Exchange integration. |
| Mailbox email address |
The email address of the equipment resource that is to be used by this VMR scheduling for Exchange integration. This is the email address you assigned when Creating an equipment resource in Exchange on-premises or Creating an equipment resource in O365. |
| VMR configuration | |
| Conference name template |
A jinja2 template that is used to generate the name of scheduled conferences. The name is used by the Management Node to identify the conference, and may also appear to conference participants (depending on the endpoint being used). Note that conference names must be unique, so a random number may be appended if the name that is generated is already in use by another service (Virtual Meeting Room, Virtual Auditorium, Virtual Reception, scheduled conference, or Test Call Service). Default: {{subject}} ({{organizer_name}}) |
| Conference description template |
A jinja2 template that is used to generate the description of scheduled conferences. Default: Scheduled Conference booked by {{organizer_email}} |
| Conference subject template |
A jinja2 template that is used to generate the subject field of scheduled conferences. This will be shown on the Management Node when viewing information about the conference, and by default will use the subject line of the meeting invitation so the default should be deleted or amended if you do not want administrators to be able to view the meeting subject. Default: {{subject}} |
| Scheduled alias prefix |
The prefix to use when generating aliases for scheduled conferences. Note: this must be between 1 and 8 characters long. |
| Scheduled alias suffix length |
The length of the random number suffix part of aliases generated for scheduled conferences. Default: 6. |
| Scheduled alias domain | The domain to use when generating aliases for scheduled conferences. |
| Join before buffer |
The number of minutes before the meeting's scheduled start time that participants will be able to join the VMR. Range: 0 to 180. Default: 30. |
| Join after buffer |
The number of minutes after the meeting's scheduled end time that participants will be able to join the VMR. Range: 0 to 180. Default: 60. |
| Scheduled conference theme |
The theme used by all conferences scheduled using the add-in. For more information, see Customizing conference images and voice prompts using themes. Default: <use Default theme> (the global default theme is used). |
| Add-in configuration | |
| Add-in server FQDN |
The FQDN of the reverse proxy or Conferencing Node (which can be either a Proxying Edge Node or Transcoding Conferencing Node) that provides the add-in content. This reverse proxy or Conferencing Node must:
Pexip's Reverse Proxy and TURN Server v3 and later supports the VMR Scheduling for Exchange feature; we recommend v5 for additional security. If you do not have a reverse proxy in your deployment, you can choose any Conferencing Node that meets the above criteria. |
| Add-in provider name |
The name of the organization which provides the add-in. Default: Pexip. |
| Add-in display name |
The display name of the add-in. Default: Pexip Scheduling Service. |
| Add-in description |
The description of the add-in. Maximum length: 250 characters. Default: Turns meetings into Pexip meetings. |
| Add-in group label |
The name of the group in which to place the add-in button on desktop clients. Default: Pexip Meeting. |
| Add-in button label |
The label for the add-in button on desktop clients. Default: Create a Pexip Meeting. |
| Add-in supertip title |
The title of the supertip help text for the add-in button on desktop clients. Default: Makes this a Pexip Meeting. |
| Add-in supertip text |
The text of the supertip for the add-in button on desktop clients. Default: Turns this meeting into an audio or video conference hosted in a Pexip VMR. The meeting is not scheduled until you select Send. |
| Add-in pane title |
The title of the add-in on the side pane. Default: Add a VMR. |
| Add-in pane description |
The description of the add-in on the side pane. Default: This assigns a Virtual Meeting Room for your meeting. |
| Add-in pane button label |
The label of the button on the side pane. Default: Add a VMR. |
| Add-in pane success heading |
The message that appears on the side pane when an alias has been obtained successfully from the Management Node. Default: Success. |
| Already video meeting heading |
The heading that appears on the side pane when the add-in is activated after an alias has already been obtained for the meeting. Default: VMR already assigned. |
| Unable to add joining instructions heading |
The heading that appears on the side pane when the Management Node cannot be contacted to obtain an alias. Default: Cannot assign a VMR right now. |
| General error heading |
The heading that appears on the side pane when an error occurs trying to add the joining instructions. Default: Error. |
| Success message |
The message that appears on the side pane when an alias has been obtained successfully from the Management Node. Default: This meeting is now set up to be hosted as an audio or video conference in a Virtual Meeting Room. Please note this conference is not scheduled until you select Send. |
| Already video meeting message |
The message that appears on the side pane when the add-in is activated after an alias has already been obtained for the meeting. Default: It looks like this meeting has already been set up to be hosted in a Virtual Meeting Room. If this is a new meeting, select Send to schedule the conference. |
| Unable to add joining instructions message |
The message that appears on the side pane when the Management Node cannot be contacted to obtain an alias. Maximum length: 250 characters. Default: Sorry, we are unable to assign a Virtual Meeting Room at this time. Select Send to schedule the meeting, and all attendees will be sent joining instructions later. |
| General error message |
The message that appears on the side pane when an error occurs trying to add the joining instructions. Default: There was a problem adding the joining instructions. Please try again. |
| Add-in image icon |
Select the image file to use as the add-in icon. Images must be in PNG file format and 80 x 80 pixels in size. Note that Outlook clients may cache the add-in icon, so it may be some time after uploading a new icon that it appears to end users. You can resolve this by deleting the cache. Default: |
| Email text (for more information, see Formatting the email text) | |
| Joining instructions template |
A jinja2 template that is used to generate the joining instructions that are added by VMR Scheduling for Exchange to the body of the meeting request. Note that the {{alias_uuid}} variable, which inserts the PXPS: token, must be included. For examples of templates that use images and other formatting, see Example joining instructions. Default: <br>
<div style="font-size:11.0pt; color:#000000; font-family:Calibri,Arial,Helvetica,sans-serif;">
<b>Please join my Pexip Virtual Meeting Room in one of the following ways:</b><br>
<br>
From a VC endpoint or a Skype/Lync client:<br>
{{alias}}<br>
<br>
From a web browser:<br>
<a href="https://{{addin_server_domain}}/webapp/conference/{{alias}}">https://{{addin_server_domain}}/webapp/conference/{{alias}}</a><br>
From a Pexip Infinity Connect client:<br>
pexip://{{alias}}<br>
<br>
From a telephone:<br>
[Your number], then {{numeric_alias}} #<br>
<br>
{{alias_uuid}}<br>
</div>
If the legacy Infinity Connect client is used by default, the web browser link in the template uses this format instead: <a href="https://{{addin_server_domain}}/webapp/?conference={{alias}}">https://{{addin_server_domain}}/webapp/?conference={{alias}}</a> |
| Placeholder instructions text |
The text that is added by VMR Scheduling for Exchange to email messages when the actual joining instructions cannot be obtained. Default: <div style="font-size:11.0pt; color:#000000; font-family:Calibri,Arial,Helvetica,sans-serif;"> This meeting will be hosted in a Virtual Meeting Room. Joining instructions will be<br> sent to you soon in a separate email.<br> </div> |
| Accept new single meeting template |
A jinja2 template that is used to produce the message sent to meeting organizers when VMR Scheduling for Exchange has successfully scheduled a new single meeting. Default: <div style="font-size:11.0pt; color:#000000; font-family:Calibri,Arial,Helvetica,sans-serif;">
This meeting has been successfully scheduled using the aliases: {{alias}} and {{numeric_alias}}.<br>
</div>
|
| Accept edited single meeting template |
A jinja2 template that is used to produce the message sent to meeting organizers when VMR Scheduling for Exchange has successfully scheduled an edited single meeting. Default: <div style="font-size:11.0pt; color:#000000; font-family:Calibri,Arial,Helvetica,sans-serif;">
This meeting has been successfully rescheduled using the aliases: {{alias}} and {{numeric_alias}}.<br>
</div>
|
| Accept new recurring meeting template |
A jinja2 template that is used to produce the message sent to meeting organizers when VMR Scheduling for Exchange has successfully scheduled a new recurring meeting. Default: <div style="font-size:11.0pt; color:#000000; font-family:Calibri,Arial,Helvetica,sans-serif;">
This recurring meeting series has been successfully scheduled.<br>
All meetings in this series will use the aliases: {{alias}} and {{numeric_alias}}.<br>
</div>
|
| Accept edited occurrence template |
A jinja2 template that is used to produce the message sent to meeting organizers when VMR Scheduling for Exchange has successfully scheduled an edited occurrence in a recurring series. Default: <div style="font-size:11.0pt; color:#000000; font-family:Calibri,Arial,Helvetica,sans-serif;">
This meeting occurrence in a recurring series has been successfully rescheduled using the aliases: {{alias}} and {{numeric_alias}}.<br>
</div>
|
| Accept edited recurring meeting template |
A jinja2 template that is used to produce the message sent to meeting organizers when VMR Scheduling for Exchange has successfully scheduled an edited recurring meeting. Default: <div style="font-size:11.0pt; color:#000000; font-family:Calibri,Arial,Helvetica,sans-serif;">
This recurring meeting series has been successfully rescheduled.<br>
All meetings in this series will use the aliases: {{alias}} and {{numeric_alias}}.<br>
</div>
|
| Reject invalid alias ID text |
The text that is sent to meeting organizers when VMR Scheduling for Exchange has failed to schedule a meeting because the alias ID in the meeting email is invalid. Default: <div style="font-size:11.0pt; color:#000000; font-family:Calibri,Arial,Helvetica,sans-serif;"> This meeting request does not contain currently valid scheduling data, and therefore cannot be processed.<br> Please use the add-in to create a new meeting request, without editing any of the content that is inserted by the add-in.<br> If this issue continues, please contact your system administrator.<br> </div> |
| Reject alias conflict template |
A jinja2 template that is used to produce the message sent to meeting organizers when VMR Scheduling for Exchange has failed to schedule a meeting because the alias conflicts with an existing alias. Default: <div style="font-size:11.0pt; color:#000000; font-family:Calibri,Arial,Helvetica,sans-serif;">
We are unable to schedule this meeting because the alias: {{alias}} is already <br>
in use by another Pexip Virtual Meeting Room. Please try creating a new meeting.<br>
</div>
|
| Reject alias deleted text |
The text that is sent to meeting organizers when VMR Scheduling for Exchange has failed to schedule a meeting because the alias for this meeting has been deleted. Default: <div style="font-size:11.0pt; color:#000000; font-family:Calibri,Arial,Helvetica,sans-serif;"> We are unable to schedule this meeting because its alias has been deleted.<br> Please try creating a new meeting.<br> </div> |
| Reject recurring series in past text |
The text that is sent to meeting organizers when VMR Scheduling for Exchange has failed to schedule a recurring meeting because all instances occurred in the past. Default: <div style="font-size:11.0pt; color:#000000; font-family:Calibri,Arial,Helvetica,sans-serif;"> This recurring series cannot be scheduled because all<br> occurrences happen in the past.<br> </div> |
| Reject single meeting in past text |
The text that is sent to meeting organizers when VMR Scheduling for Exchange has failed to schedule a meeting because it occurred in the past. Default: <div style="font-size:11.0pt; color:#000000; font-family:Calibri,Arial,Helvetica,sans-serif;"> This meeting cannot be scheduled because it occurs in the past.<br> </div> |
| Reject general error template |
A jinja2 template that is used to produce the message sent to meeting organizers when VMR Scheduling for Exchange has failed to schedule a meeting because a general error has occurred. The {{correlation_id}} variable is a UUID which can be used to find more information from the administrator log. Default: <div style="font-size:11.0pt; color:#000000; font-family:Calibri,Arial,Helvetica,sans-serif;">
We are unable to schedule this meeting. Please try creating a new meeting.<br>
If this issue continues, please forward this message to your system administrator, including the following ID:<br>
CorrelationID="{{correlation_id}}".<br>
</div>
|
| Advanced options | |
| Use custom add-in sources |
Enable this option to override the default locations from which the add-in JavaScript and CSS are served. This option is intended for use in deployments that are fully offline (where Outlook users will not have internet access) and therefore these resources must be available locally. If you enable this option, you must host these files on your own internal server, and enter the URLs for each in the relevant fields below. We recommend contacting your Pexip authorized support representative before enabling this option. |
| Office.js URL |
(Available if Use custom add-in sources has been enabled) The URL used to download the Office.js JavaScript library. |
| Microsoft Fabric CSS URL |
(Available if Use custom add-in sources has been enabled) The URL used to download the Microsoft Fabric CSS. |
| Microsoft Fabric Components CSS URL |
(Available if Use custom add-in sources has been enabled) The URL used to download the Microsoft Fabric Components CSS. |
| Additional add-in script sources |
(Available if Use custom add-in sources has been enabled) Optionally specify additional URLs from which to download JavaScript script files. These URLs will be used in preference to any other URLs specified elsewhere for the same resource. In particular, we recommend that you specify here the URL for MicrosoftAjax.js. Each URL must be entered on a separate line. |
| Exchange domains | |
| Domain |
The FQDN of the Microsoft Exchange server that is configured in the EWS URL field. For Office 365 deployments this will be outlook.office365.com. If your Exchange deployment uses more than one FQDN (for example, if you have an on-premises Microsoft Exchange deployment with more than one Microsoft Exchange server, or your Exchange server has more than one FQDN), you must include all the FQDNs of all the Exchange servers in your deployment. To do this, select and add the FQDN of each. If you have a hybrid Exchange and Office 365 deployment, you must include all the Exchange server FQDNs as well as outlook.office365.com in the list of domains. |
|
|
|

Signing in to the service account if OAuth has been enabled
If you have enabled OAuth for the first time, you must sign in to the service account after saving the configuration of the VMR scheduling for Exchange integration.
You may also need to re-sign in to the service account if:
- you disable and then subsequently re-enable OAuth
- you update any of the following configuration for the VMR scheduling for Exchange integration:
- Service account username
- OAuth client ID
- OAuth token endpoint
- the Management Node has been offline for more than 90 days.
To sign in to the service account:
- Ensure you have signed out of all Microsoft accounts on your device, including the Microsoft Azure portal.
-
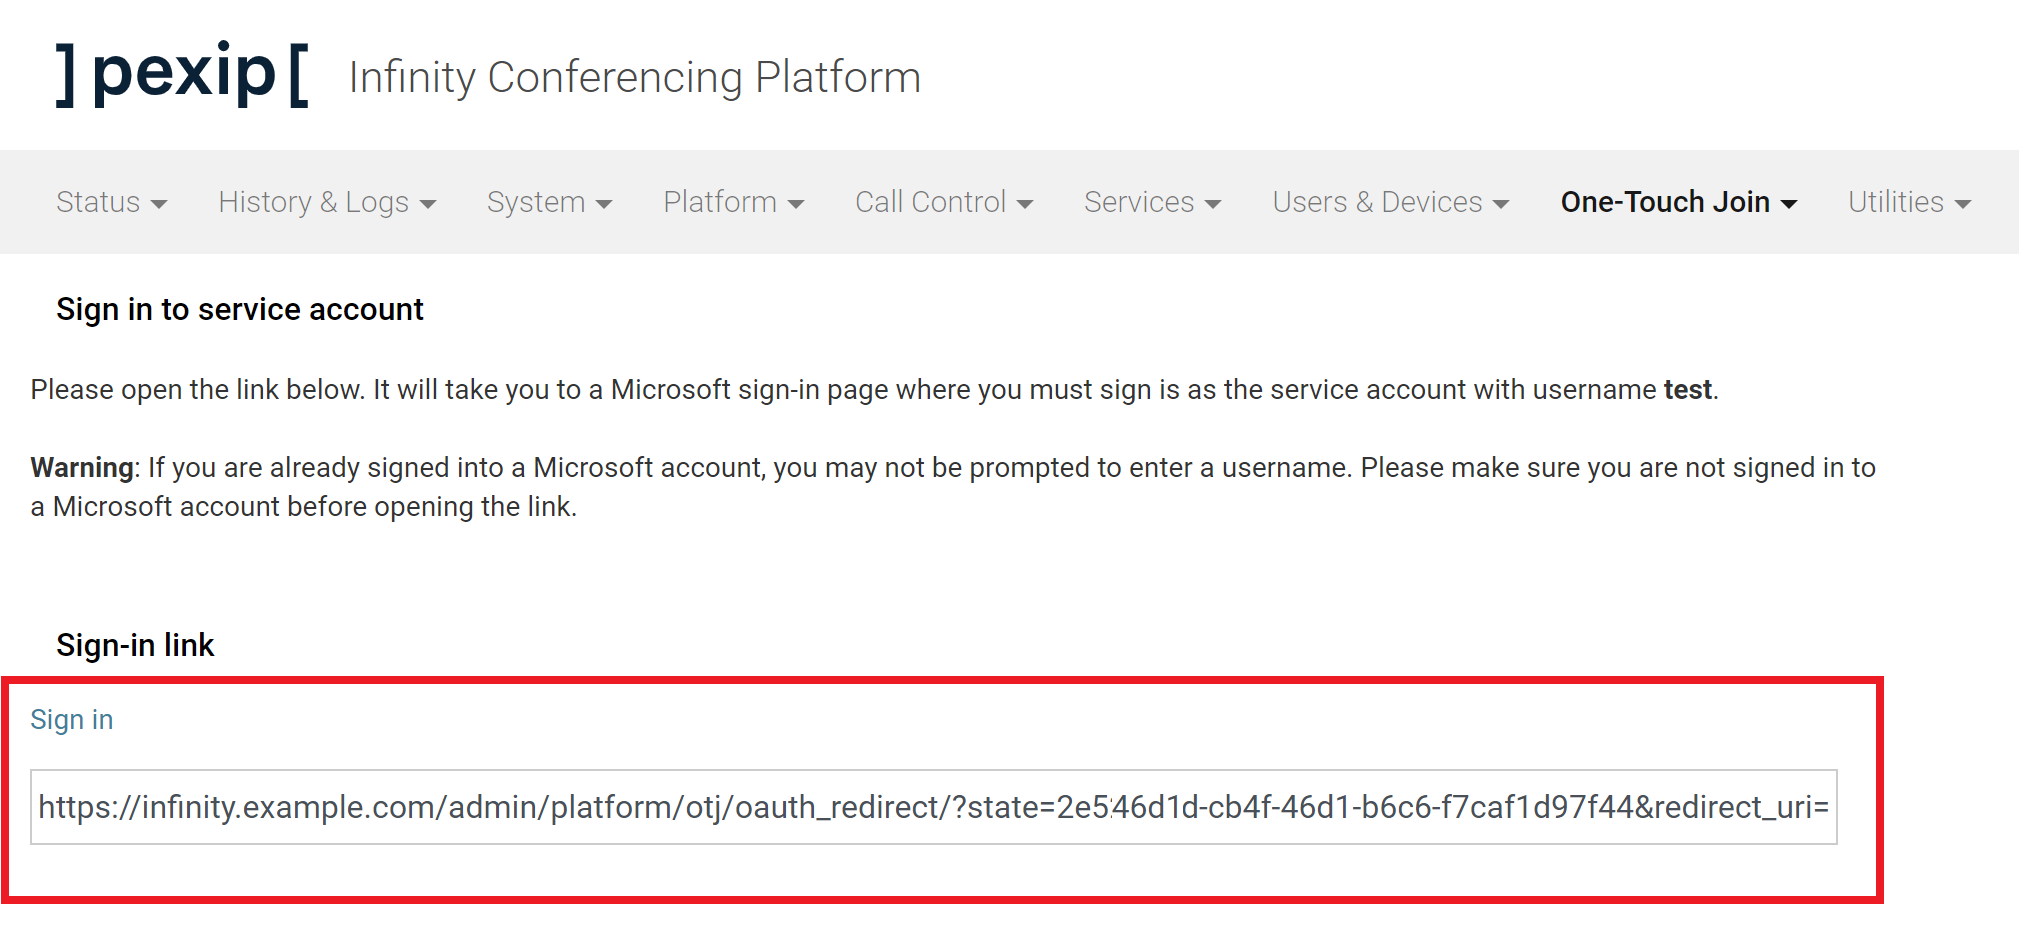
From the Management Node, go to and select the VMR scheduling for Exchange integration. At the bottom of the page, select .
You will be taken to the Sign in to service account page

- Copy the Sign in link and paste it into a new browser tab.
-
Sign in as the service account.
You will be asked to permit the Application registration to access the service account:

- Select .
You should be returned to the Sign in to service account page and see the message Successfully signed in.
Saving and checking configuration
When you have finished, select . You will be taken back to the main page. The Infinity Connect platform will attempt to contact the Microsoft Exchange deployment, and if there are any issues, it will raise an alarm on the Management Node.
Formatting the email text
All the templates and text specified in the Email text section can be entered as HTML. This allows you to customize the text (for example, the font, size, and color). When using HTML, you must ensure all HTML tags are closed properly, otherwise you may affect the format of any existing text in the email body.
The add-in pane headings and text can also be formatted using HTML, although some formatting may be overridden by the base HTML. We recommend that you check that any formatting applied to add-ins appears as expected in all clients used in your environment.
Working with jinja2 templates
VMR Scheduling for Exchange uses a subset of the jinja2 templating language (http://jinja.pocoo.org/docs/dev/) to create the text used in emails.
For more reference information and to see where else jinja2 templates are used within Pexip Infinity, see Jinja2 templates and filters.
Variables
The following variables can be used when creating the jinja2 templates used for VMR Scheduling for Exchange:
| Variable | Description |
|---|---|
| {{subject}} |
Inserts the subject line of the meeting invitation sent by the meeting organizer. Note that this information will be visible to anyone with access to the Management Node, so do not use this variable if privacy is an issue. |
| {{organizer_name}} |
Inserts the name of the meeting organizer, as it appears in the meeting invitation. |
| {{organizer_email}} |
Inserts the email address of the meeting organizer. |
| {{addin_server_domain}} |
Inserts the FQDN configured in the Add-in server FQDN field. This FQDN is used by Infinity Connect clients as part of the address to use when connecting to the meeting. For more information, see Creating preconfigured links to launch conferences via Infinity Connect. |
| {{alias}} |
Inserts the full alias that was generated for the VMR that will be used for this meeting. This is in the format: <prefix><random_number>@domain. |
| {{numeric_alias}} |
Inserts the numeric part of the alias that was generated for the VMR that will be used for this meeting. This is in the format: <prefix><random_number>. |
| {{alias_uuid}} |
Inserts the PXPS:- ID. For more information, see PXPS:- and TOK:- security tags. The Joining instructions template must contain this variable. |
| {{start_time}} |
Inserts the start time of the meeting, as per the meeting request. (This time does not include the Join before buffer.) Note that this will use the format hh:mm on DD/MM/YYYY, e.g. 15:30 on 31/07/2017; this format cannot be changed. |
| {{end_time}} |
Inserts the end time of the meeting, as per the meeting request. (This time does not include the Join after buffer.) Note that this will use the format hh:mm on DD/MM/YYYY, e.g. 15:30 on 31/07/2017; this format cannot be changed. |
|
|
|
Deleting and replacing VMR scheduling for Exchange integrations
If you delete an existing VMR scheduling for Exchange integration and replace it with another, you must also re-generate and re-install the add-in XML file, even if the configuration of the new VMR scheduling for Exchange integration is identical to that of the old one.
Using multiple VMR scheduling for Exchange integrations
Different groups of users within the same Microsoft Exchange deployment
You can provide different groups of users within your Microsoft Exchange deployment with different options when using the VMR Scheduling for Exchange feature. For example, you may wish to vary the prefix used as part of the VMR alias, or use different text for the joining instructions. To do this, create multiple VMR scheduling for Exchange integrations that connect to the same Exchange environment. (Note however that each VMR scheduling for Exchange integration must have a separate equipment resource.)
Each VMR scheduling for Exchange integration that you create will have an associated add-in which you can then make available to specific users by using Exchange PowerShell commands.
The diagram below shows a single Pexip Infinity deployment with two VMR scheduling for Exchange integrations to the same Microsoft Exchange deployment. Each VMR scheduling for Exchange integration uses the same EWS URL and is configured with the FQDNs of all the Exchange servers in the Exchange deployment.
The first connection provides an add-in for sales staff; the second provides an add-in for development staff. Both add-ins are uploaded to Microsoft Exchange, but each user will only see the add-in relevant to their group.

Different Microsoft Exchange deployments
If you are a service provider, you can configure one or more VMR scheduling for Exchange integrations for each of your customers.
The diagram below shows a single Pexip Infinity deployment with two VMR scheduling for Exchange integrations to two different Microsoft Exchange deployments. The first connection provides an add-in for everyone at Example Corp; the second provides an add-in everyone at Acme Corp.

Next step
- Making the add-in available to users within your Exchange deployment.