Customizing conference images and voice prompts using themes
Themes allow you to change the voice prompts and images provided to participants when they use a Pexip Infinity service (Virtual Meeting Room, Virtual Auditorium, Virtual Reception, scheduled conference, Media Playback Service, or Test Call Service) or use the Infinity Gateway to make a person-to-person call or to join an externally-hosted conference, such as a Microsoft Teams or Skype for Business meeting, or Google Meet. You might change the theme if, for example, you want to use your company's own logo, color scheme or terminology on the screens displayed to conference participants, or you want to change the language used in the voice prompts.
You can also define your own custom conference layouts within a theme and use those layouts in the same way as the standard layouts that are shipped by default in Pexip Infinity.
You have full flexibility when applying themes to services. You apply specific themes to individual services and Call Routing Rules, and you can nominate a global default theme to use for any services that have not had a specific theme applied to them.
Each conference theme is made up of a set of audio and image files and configuration settings. You can replace any or all of these files with your own customized sounds, images or settings in order to create a new theme and apply a theme to a specific service.
Pexip Infinity ships with its own Base theme, which cannot be edited. Files and configuration settings from the Base theme are used when no other theme has been selected, or when the selected theme does not contain a specific file or setting. Pexip Infinity also ships with a number of preconfigured themes — these include alternative themes that contain entry and exit tones and localized audio files — making it easier for you to select and create themes suitable for your deployment.
Pexip branding portal
We recommend using the Pexip branding portal (https://webapp2-branding.pexip.io/) to customize your themes. The portal provides an easy way to change the text, images, splash screen layouts and some of the settings that are used in themes, and it generates a ZIP file that you can upload via the Administrator interface. Note that you cannot change the audio files via the branding portal.
You can also manually configure your own themes as described in this documentation if you have more advanced customization requirements, or want to use your own audio files.
If you use the Pexip Connect apps to access your services, you can also use the branding portal to customize the look and feel of those clients.
How do I know which files and configuration settings will be used in a particular VMR?
When you create a new customized theme, you don't have to upload a complete set of files and configuration settings — you can just upload the files and settings you want to use specifically for that theme, to override the default behavior. When a user accesses a service (such as a VMR) that has that theme applied, Pexip Infinity presents them with the sounds and images from the files included in that theme. If the customized theme does not include a specific file or setting, or the service does not have a theme applied, then Pexip Infinity uses the relevant file or setting from the theme that has been selected as the default theme. If the default theme does not include the specific file or setting either, then the file or setting from the Base theme is used.
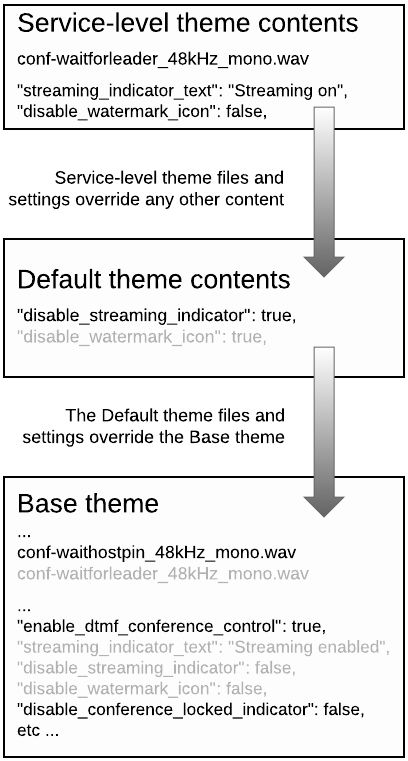
For example, this diagram (right) shows how some files and settings in the Base theme (the conf-waitforleader_48kHz_mono.wav audio file, and the streaming_indicator_text, disable_streaming_indicator and disable_watermark_icon settings in the themeconfig.json file, all shown faded out) are overridden by the equivalent files or settings in the default theme (the disable_streaming_indicator setting in this example) and any service-level theme (the conf-waitforleader_48kHz_mono.wav file, and the streaming_indicator_text and disable_watermark_icon settings).
Note that, in this example, even though the default theme includes the disable_watermark_icon setting, that setting is itself overridden by the service level theme; however, if a service did not have that service-level theme applied, then the default theme setting of disable_watermark_icon: true would apply to that service.
If a theme is only assigned to Call Routing Rules, you only need to customize the relevant subset of the image files (see Themes used by Call Routing Rules (gateway calls) for more information).
If you use the Pexip branding portal to create your theme it will automatically include just the relevant settings and files required to override the default behavior.
New and legacy style themes
Version 18 of Pexip Infinity introduced a new way to specify the content and layout of your own customized themes that is more efficient than the previous style themes, and offers more flexibility when customizing them for your own requirements.
Legacy style themes (identified as "version 1" themes) and new style themes (identified as "version 2" themes) can both be used on the same platform, with legacy style themes applied to some services and new style themes applied to other services if required. The way in which themes are uploaded to Pexip Infinity and applied to services is the same for both new and legacy style themes. The new style base theme is used by default if you have not applied any customized themes to your services.
Both types of themes behave in exactly the same manner as each other, and look almost the same by default (some of the PIN-entry splash screen graphics used when joining a conference are different). The audio prompts are the same in new and legacy style themes.
The main difference between how legacy and new style themes work and are configured/customized, is that legacy style themes use a JPG file containing a combined background image, graphics and text for each of the splash screens used when joining a conference (such as the Welcome screen and PIN entry screens). The new style themes separate out these elements, allowing you to specify the individual background image, graphics and text elements that are used on each screen, and control where each of those elements is positioned (via new configuration options in the theme's themeconfig.json file). See the section on splash screens for more information.
Controlling whether new or legacy theme files are used
A configuration switch in the theme's themeconfig.json file is used to control whether the theme is a new or legacy style — if it contains "theme_version": 2 then new style themes are used. This switch has to be present in a themeconfig.json file at the lowest level of the theme file hierarchy where a theme has been applied i.e. if you have applied a theme to a specific service then, for new style themes to be used, that theme must contain a themeconfig.json file that includes the "theme_version": 2 switch.
Therefore, even if you only want to customize a single image or sound file or the vendordata file, you must include in your ZIP upload a themeconfig.json file that contains a "theme_version": 2 switch, if you want to use new-style themes.
The flow chart shows how the inclusion or not of "theme_version": 2 controls whether a new or legacy-style theme is displayed.
The Pexip branding portal can be used to customize new and legacy-style themes, and any themes created via the branding portal automatically include the relevant new/legacy switches in the theme's themeconfig.json file when required.