Configuring Office 365 for scheduling
The VMR Scheduling for Exchange feature allows you to create an add-in that enables Microsoft Outlook desktop and Web App users in Office 365 or Exchange environments to quickly and easily add a Pexip VMR to their meeting invitations, enabling any meeting to be held over video.
To enable users to schedule meetings in single-use VMRs in an
-
Creating a service account. The Pexip Infinity VMR Scheduling for Exchange feature uses a unique service account to log into Exchange.
This should be a different service account to any used for One-Touch Join, because the configuration will be different.
-
Configuring Application Impersonation on the service account. This allows the service account to impersonate all users and resources in Exchange.
As an alternative, you can allow the service account to impersonate the VMR Scheduling for Exchange equipment resource only, but this will limit the functionality of the feature. For more information, see Using application impersonation.
-
Create an equipment resource. This resource will be added as an attendee to all meetings scheduled using the Pexip add-in.
- Configure the equipment resource.
- Enable OAuth authentication for the service account.
PowerShell commands are provided for all steps; parameters to be replaced with your own relevant information are shown in the format <your info here>.
Prerequisites
Before you start, ensure you can access your Office 365 Admin Center: https://portal.office.com/adminportal/home#/homepage.
You will also need to have a remote PowerShell session to your Exchange server. See these Microsoft articles about connecting to Exchange online and Microsoft 365 with PowerShell for more information.
Note that for Office 365, the service account must have a mailbox license and appropriate licenses to allow it to connect to Exchange and use EWS.
In this step, you create the service account to be used by VMR Scheduling for Exchange.
The VMR Scheduling for Exchange feature uses a service account to log into Exchange. You can use an existing service account (the same service account can be used by more than one VMR scheduling for Exchange integration), or create a new account.
You need to provide the authentication credentials of this service account when configuring Pexip Infinity to integrate with a Microsoft Exchange deployment.
After creating the service account, you must ensure that it is assigned an appropriate Exchange license, such as Office 365 Enterprise E1, Office 365 Business Basic (formerly Essentials) or one of the Exchange Online plans.
A single service account can be used by more than one VMR scheduling for Exchange integration.
Changes to the service account may take some time to take effect, depending on the cache lifetime configured on the Microsoft Exchange server.
If the service account is subject to a password rotation policy or uses multi-factor authentication (MFA), then each time the password changes or the MFA is refreshed, you must sign in to the service account again via the Pexip Infinity Administrator interface.
You can create a new service account using either the Microsoft 365 admin portal or PowerShell, as follows:
| Microsoft 365 | PowerShell |
|---|---|
|
You must run Powershell as administrator. Establishing a remote connection To use PowerShell for Office 365 you first need to connect remotely. These commands install the required PowerShell modules (if they are not already installed) and then connects to Exchange Online: #If not installed, install Exchange Online Module Install-Module ExchangeOnlineManagement #If not installed, install Azure AD Module Install-Module -Name AzureAD #Connect to Exchange Online and AzureAD, works also with a MFA enabled account Connect-ExchangeOnline Creating the service account The first command lets the administrator type in a password for the service account as a secure string. This password variable is then used in the second command to create a mailbox for the service account. The remaining commands log you into Microsoft Entra ID (Azure AD) and then set the password of the service account to never expire. #Capture password for service account $password = Read-Host "Enter password" -AsSecureString # Create service account and mailbox New-Mailbox -Name "<Account Name>" -MicrosoftOnlineServicesID "<UPN>" -Password $password -Alias "<Account Alias>" -FirstName "<Account First Name>" -LastName "<Account Last Name>" -DisplayName "<Account Name>" #Connect to AzureAD Connect-AzureAD #Set password policy Set-AzureADUser -ObjectId "<UPN>" -PasswordPolicies DisablePasswordExpiration Example New-Mailbox command: New-Mailbox -Name "Service Account" -MicrosoftOnlineServicesID pexip@example.com -Password $password -Alias pexip -FirstName Service -LastName Account -DisplayName "Service Account" Example Set-AzureADUser command: Set-AzureADUser -ObjectId pexip@example.com -PasswordPolicies DisablePasswordExpiration Assigning a license to the service accountYou must now assign an appropriate license to the service account. See https://docs.microsoft.com/en-us/powershell/azure/active-directory/enabling-licenses-sample for information on how to do this. |


In this step you configure the service account with a Role of Application Impersonation. This allows the service account to impersonate the equipment resource that is to be used for the VMR Scheduling for Exchange, and all users who will be using this service. Alternatively, you can allow impersonation of the equipment resource only, but this will limit the functionality of the VMR Scheduling for Exchange feature. For more information, see Using application impersonation.
Impersonating all users and resources
The VMR Scheduling for Exchange service impersonates users when sending email updates containing joining instructions (in cases where these instructions could not be added at the time of scheduling). This makes it appear to the recipients that the joining instructions were sent from the meeting organizer, instead of the service account. The service account also impersonates the VMR Scheduling for Exchange equipment resource in order to read the calendar.
To check if your service account has Application Impersonation already configured, use the PowerShell command:
Get-ManagementRoleAssignment -RoleAssignee "<email_of_service_account>" -Role ApplicationImpersonation | Format-List
Below is an example of the output of the command when the service account already has Application Impersonation configured:
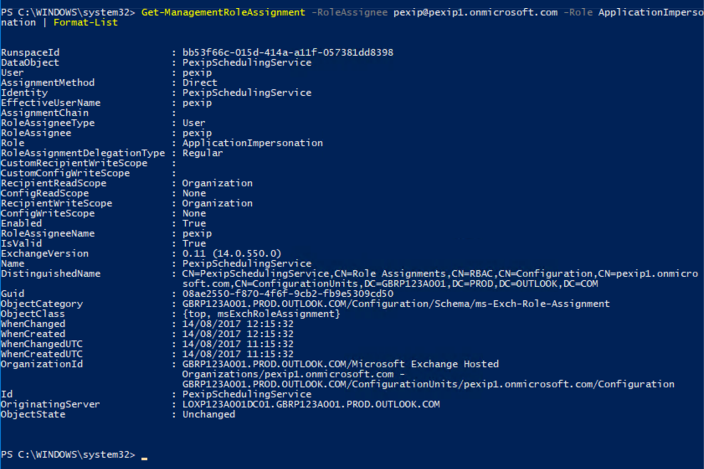
If the service account does not have Application Impersonation configured, then the above command will not return anything at all. If this is the case, enable Application Impersonation as follows:
New-ManagementRoleAssignment -name:"<role_name>" -Role:ApplicationImpersonation -User:"<email_of_service_account>"
For example:
New-ManagementRoleAssignment -name:PexipSchedulingService -Role:ApplicationImpersonation -User:pexip@exchange.example.com
This will enable the service account to impersonate all users and resources in the organization.
For more information on these commands, see Microsoft help:
- Configuring Application Impersonation: https://msdn.microsoft.com/en-us/library/office/dn722376%28v=exchg.150%29.aspx
- Get-ManagementRoleAssignment command: https://technet.microsoft.com/en-us/library/dd351024(v=exchg.150).aspx
- New-ManagementRoleAssignment command: https://technet.microsoft.com/en-us/library/dd335193(v=exchg.150).aspx
- Set-ManagementRoleAssignment command (used if you need to edit the role assignment): https://technet.microsoft.com/en-us/library/dd335173(v=exchg.150).aspx
Impersonating resources only
If you do not want to permit the service account to access all users and resources in your organization, you can instead permit it to access the VMR Scheduling for Exchange equipment resource only, but this will limit the functionality of the feature. For more information, see Using application impersonation.
To do this, you must first create the equipment resource and assign it an email address.
Then use the following PowerShell command:
$restriction_filter = "UserPrincipalName -eq ""<email_of_equipment_resource>"""
$scheduling_service_account = "<email_of_service_account>"
$management_scope_to_create = "Pexip Scheduling Management Scope"
$impersonation_role_name_to_create = "Pexip Scheduling Impersonation"

New-ManagementScope -Name $management_scope_to_create -RecipientRestrictionFilter $restriction_filter

New-ManagementRoleAssignment -Name $impersonation_role_name_to_create -Role ApplicationImpersonation -User $scheduling_service_account -CustomRecipientWriteScope $management_scope_to_create
In this step you create an equipment resource to be used by VMR Scheduling for Exchange. This resource is added as an attendee to all meetings scheduled using the Pexip add-in. The scheduling service monitors the equipment resource's mailbox, processes all meeting requests sent to it, and schedules the meetings as appropriate.
An equipment resource can only be used by a single VMR scheduling for Exchange integration. If you have separate test and development environments, you must use a different resource for each.
The equipment resource will be added as a resource attendee to all VMR Scheduling for Exchange meetings. Users will see replies from this resource when it accepts or rejects a meeting request.
Each equipment resource can be used by only one VMR scheduling for Exchange integration.
Previously we recommended using a room resource, but this may cause issues if users are using the Room Finder tool. For this reason, we now recommend using an equipment resource.
You can create an equipment resource using either the Office 365 admin portal or PowerShell, as follows:
| Microsoft 365 | PowerShell |
|---|---|
|
To create the equipment resource via the Microsoft 365 admin portal:
The equipment resource now appears in the list of resources. |
This command creates an equipment resource with the specified Name, Alias and Display Name. Name and Display Name should be the same, and will appear as the location of any meeting requests, and as a recipient. The Alias (also known as the mail nickname) will be used as the email address. New-Mailbox -Equipment -Name "<Equipment Name>" -Alias "<Equipment Alias>" -DisplayName "<Equipment Name>" For example: New-Mailbox -Equipment -Name "Pexip Meeting" -Alias pexipmeeting -DisplayName "Pexip Meeting" |

In this step you disable automatic processing for the equipment resource, so that the processing can be done by the scheduling service. You must also configure it to permit conflicts, because meetings may be scheduled at the same time by different users.
This configuration is done using the following PowerShell command:
Set-CalendarProcessing -Identity "<email_of_equipment_resource>" -AutomateProcessing None -AllowConflicts $true -BookingWindowInDays 1080 -MaximumDurationInMinutes 0 -AllowRecurringMeetings $true -EnforceSchedulingHorizon $false -ScheduleOnlyDuringWorkHours $false -ConflictPercentageAllowed 100 -MaximumConflictInstances 2147483647
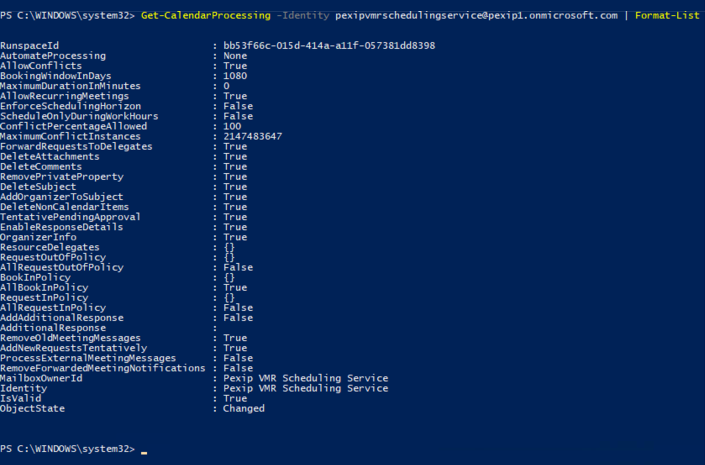
To verify that the above command has configured everything correctly, use the PowerShell command:
Get-CalendarProcessing -Identity "<email_of_equipment_resource>" | Format-List
The output should look something like this:
For more information on these commands, see Microsoft help:
- Set-CalendarProcessing command: https://technet.microsoft.com/en-us/library/dd335046(v=exchg.160).aspx
- Get-CalendarProcessing command: https://technet.microsoft.com/en-us/library/dd298137(v=exchg.160).aspx
In this step you enable OAuth authentication for the service account.
VMR Scheduling for Exchange uses a service account to log in to Exchange.
As of October 2022, Microsoft will stop supporting and fully decommission basic authentication for EWS to access Exchange Online (for more information, see Microsoft's announcement). We therefore strongly recommend that for Office 365, all new deployments authenticate the service account using OAuth 2.0, and all existing deployments are updated to enable this option as soon as possible.
To use OAuth for the service account, you must create an app registration in Azure and then use the settings from this app registration when enabling and configuring the OAuth options within the
Create a new App Registration in Azure
- Log into the Azure portal at aad.portal.azure.com.
- From the main panel on the left, select .
-
Select and then :

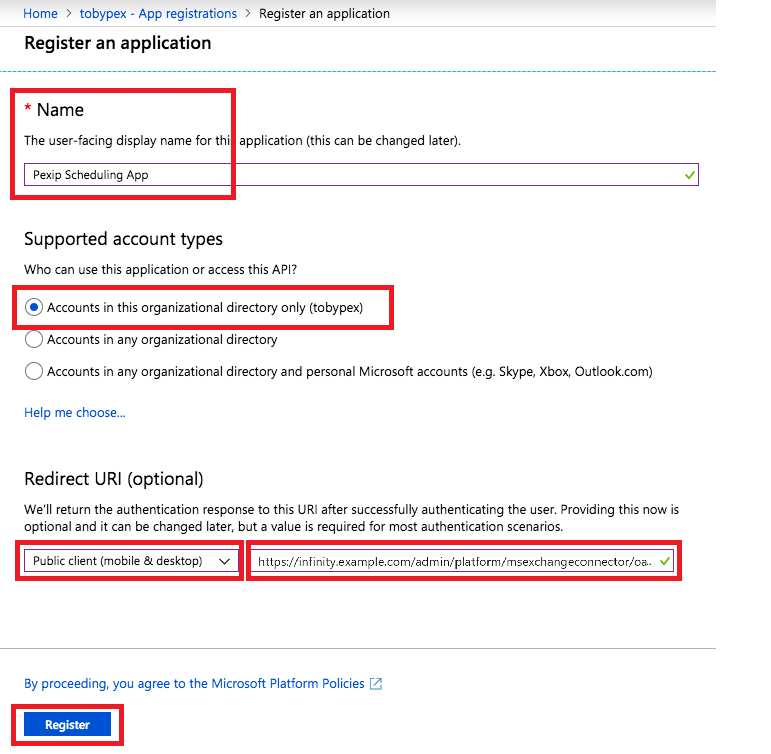
- In the Register an application panel, enter the following options:
- Name: this can be anything you wish. In our example we have used Pexip Scheduling App.
- Supported account types: select Accounts in this organizational directory only.
Redirect URI: from the drop-down menu, select Public client/native (mobile and desktop). The URI must use the IP address or FQDN of the Management Node, in the format
In our example we have used https://infinity.example.com/admin/platform/msexchangeconnector/oauth_redirect/You will need to enter this as the OAuth redirect URI when configuring a
The OAuth redirect URI is the page on the Administrator interface to which the Pexip Infinity administrator will be returned after they have successfully signed in to the service account. Because it is a page on the Management Node, this URI is internal to your deployment and only needs to be accessible from the administrator's web browser; you do not need to make it externally accessible. This URI must be the same on Azure and Pexip Infinity in order for Azure to validate the sign-in request.

-
Select .
A new panel will open where you can configure your application.
- From the panel on the left, select .
- Select .
-
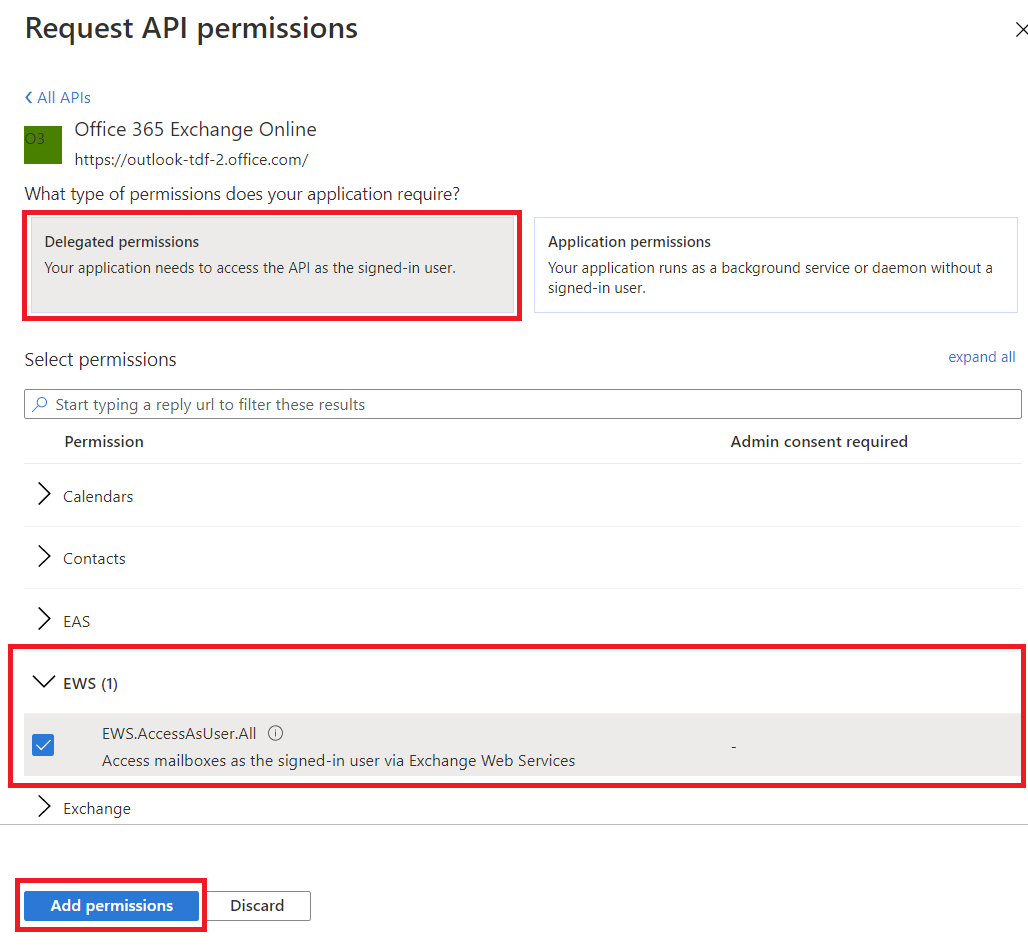
From the Request API permissions panel, select , search for Office 365 Exchange Online and select it:

-
Select Delegated permissions, and from the Select permissions list, expand EWS and select Access mailboxes as the signed-in user via Exchange Web Services, and then select :


Taking note of configuration
When you Configure the VMR scheduling for Exchange integration and enable OAuth authentication for the service account, you'll need to provide the following information from Azure:
-
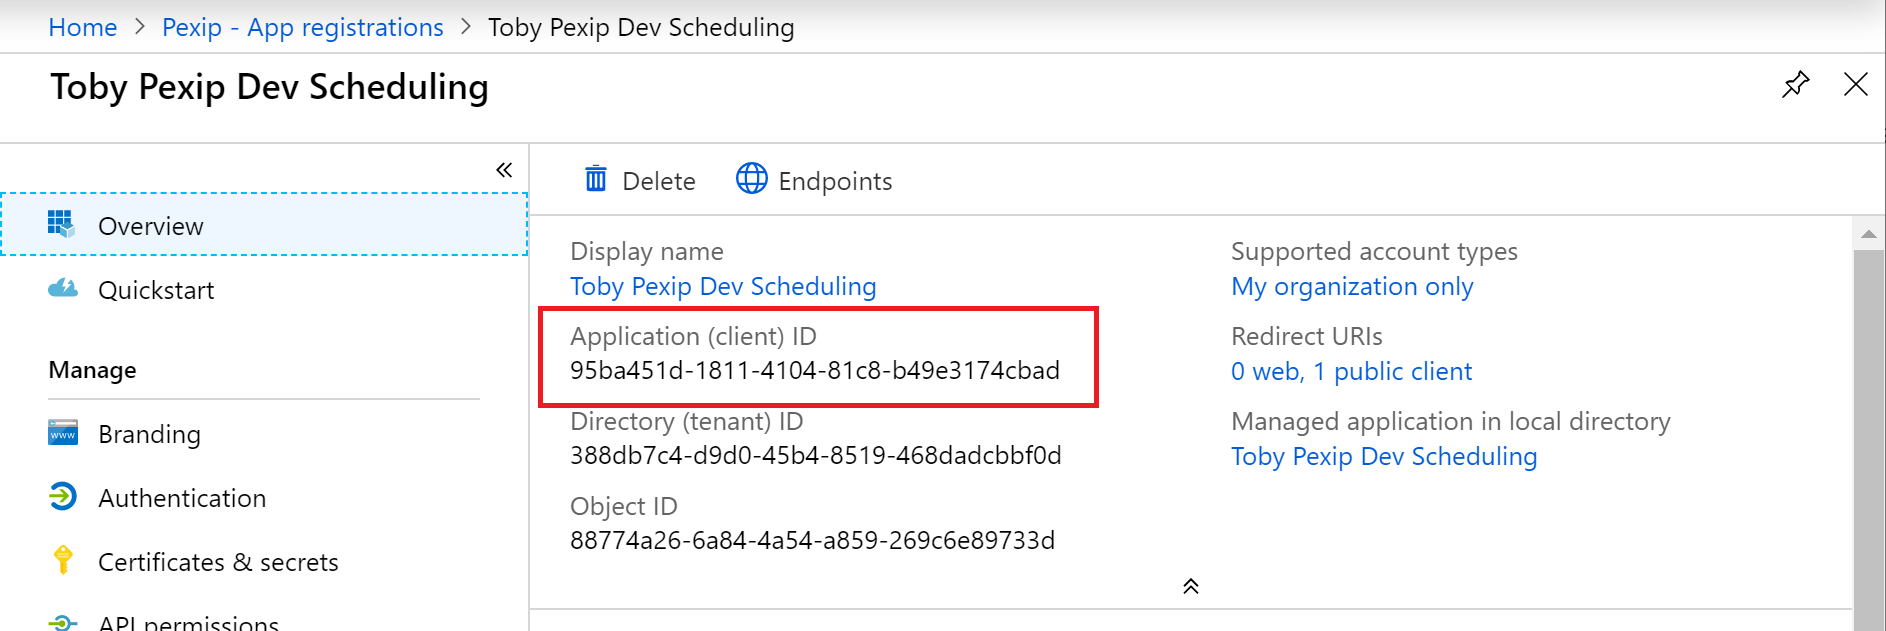
Application (client) ID: this was generated for you by Azure when you saved the App Registration:

You can find this again in Azure under , under the Application (client) ID column.
You will need to enter this as the OAuth client ID when configuring the VMR scheduling for Exchange integration.
-
Redirect URI: this is the URI you entered when creating the App Registration.
You can find this again in Azure under , clicking on the app registration, and then clicking Redirect URIs.
You will need to enter this as the OAuth redirect URI when configuring the VMR scheduling for Exchange integration.
You will also need to know the OAuth Endpoints to use. To find this information:
- In the Azure Portal, select Overview > Endpoints.
-
Copy the URL of the OAuth 2.0 authorization endpoint (v1).
Ensure that you use the URL for ... endpoint (v1), not ... endpoint (v2).
You will need to enter this as the OAuth authorization endpoint when configuring the VMR scheduling for Exchange integration.
-
Copy the URL of the OAuth 2.0 token endpoint (v1)
Ensure that you use the URL for ... endpoint (v1), not ... endpoint (v2).
You will need to enter this as the OAuth token endpoint when configuring the VMR scheduling for Exchange integration.

Viewing the equipment resource's mailbox
There may be occasions, such as when troubleshooting, that you want to view the equipment resource's mailbox or calendar. To do this, you first need to assign full access to the equipment resource's mailbox to a delegate account, and then view the mailbox or calendar using the delegate account. (The delegate account could be the service account, or it could be, for example, an administrator's account.)
Next steps
- Configuring Pexip Infinity to integrate with your Microsoft Exchange deployment and create the VMR Scheduling for Exchange add-in.
- Making the add-in available to users within your Microsoft Exchange deployment.